


6-52 Chapter 6
Removing and Replacing Parts
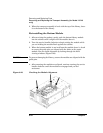
Removing and Replacing the Motherboard
b. Pull out the front doors and unscrew the screws that secure the
library to the rack.
c. Push the library out until it hits the stop bracket (approximately
60% out of the rack).
TIP If the library is rackmounted, remove the right side panel of the rack to
access the motherboard.
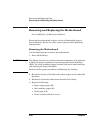
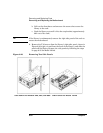
9. Remove the T-10 screws from the library’s right-side panel, shown in
Figure 6-28 (right, viewed from the front of the library), and slide the
panels off the library. Remove the side panels by following the steps
on page 6-35 for Model 12/140.
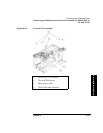
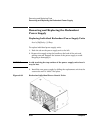
Figure 6-28 Removing Two Side Panels
Side Panels for Models 2/20, 4/40, and 6/60 Side Panels for Model 12/140