


Chapter 6 6-13
Removing and Replacing Parts
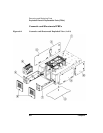
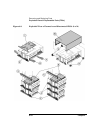
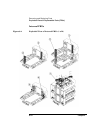
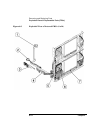
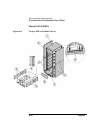
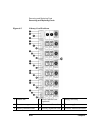
Exploded Views of Replaceable Parts (FRUs)
Errors and Troubleshooting
Removing/Replacing Parts
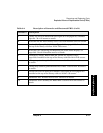
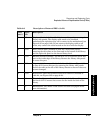
Table 6-5 Description of Internal FRUs (1 of 2)
Call-
out #
FRU
ID
Description
1 N/A Back gear rail without stop for multi-level libraries. Install this part
by removing all drives and installing the rails from the back of the
library. Two 6-19 x .5 screws secure the top and bottom of the rail to
the library chassis. On the lowest library level, you will have to
remove the transport assembly to access this part (see “Accessing the
Side Panels for Service” on page 6-35).
2 N/A Front gear rail without stop for multi-level libraries. Install this part
by removing the viewing window from the front of the library. Two 6-
19 x .5 screws secure the top and bottom of the rail to the library
chassis. On the lowest library level, you will have to remove the
transport assembly to access this part (see “Accessing the Side Panels
for Service” on page 6-35).
3 N/A Back gear rail with stop (packaged with front and upper gear rails
and accessed by removing the drives).
4 N/A Front gear rail with stop (packaged with back and upper gear rails
and accessed by removing the front viewing window).
5 N/A Left magazine lock assembly. Includes the door tray detecting switch.
Access this part by removing the panels on the left side of the library.
Two 6-32 x .375 T-15 screws secure this assembly to the library
chassis. Avoid damaging the cables and connectors.
6 N/A Right magazine lock assembly. Includes the door tray detecting
switch Access this part by removing the panels on the right side of the
library. Two 6-32 x .375 T-15 screws secure this assembly to the
library chassis. Avoid damaging the cables and connectors.
7 24 Vertical lift assembly: Uses #6-19 x .5 screws to attach (see page 6-46
for more information).