


Chapter 6 6-45
Removing and Replacing Parts
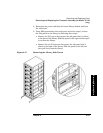
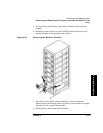
Removing and Replacing the Transport Assembly (for Model 12/140
only)
Errors and Troubleshooting
Removing/Replacing Parts
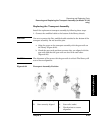
Reassembling the Library
After replacing the transport assembling and reconnecting the modules,
complete the following:
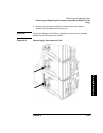
1. Reattach the interconnect cable between the bottom two modules (see
Figure 6-18 on page 6-39).
2. Replace the screws that secure the retainer brackets on the bottom
module to the cabinet (see Figure 6-20 on page 6-41).
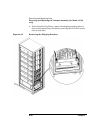
3. Replace the library side panels on the bottom two modules (see
Figure 6-17 on page 6-37).
4. Replace the side panels on the cabinet (see Figure 6-16 on page 6-36).
5. Replace the shipping brackets (see Figure 6-19 on page 6-40).
6. Replace the external cables and power cord on the bottom module.
NOTE If the new transport has a different firmware revision than the rest of the
library components, the library could go into a partial availability state.
When this occurs, the front panel will display
Partly Available, and the
illuminated LED beneath the front panel display will be solid amber. This
is not an indication of a failure, but may be an indication to download
firmware. (See “Upgrading Firmware” on page 6-68.)