


6-28 Chapter 6
Removing and Replacing Parts
Removing and Replacing the Transport Assembly (for Models 2/20, 4/
40, and 6/60 only)
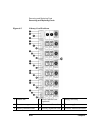
Removing and Replacing the Transport
Assembly (for Models 2/20, 4/40, and 6/60 only)
Level of Difficulty: [4] Difficult
NOTE For Model 12/140, refer to page 6-35.
The instructions for this assembly are divided into the following sections:
•“Accessing the Transport Assembly” on page 6-28
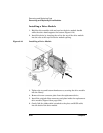
•“Removing the Transport Assembly” on page 6-31
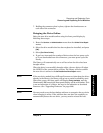
•“Replacing the Transport Assembly” on page 6-32
•“Replacing the Cover” on page 6-34
Two Field Replaceable Units (FRUs) are involved with the transport
assembly: the transport assembly and the vertical lift assembly. Either
assembly may be replaced separately, but both must be removed to
replace either one.
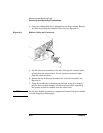
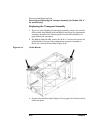
Accessing the Transport Assembly
Use the following steps to access the transport assembly:
1. Power off the library.
2. If the library is rackmounted, use the following steps to slide it
forward in the rack:
a. Lower the rack’s lever feet, and fully extend the anti-tip foot at the
bottom front of the rack.
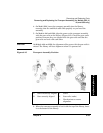
WARNING Failure to extend the anti-tip foot of the rack could result in
damage to the library and/or personal injury.
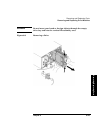
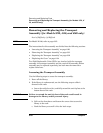
b. Pull out the front doors and loosen the screws that secure the
library to the rack.
c. Push the library out until it hits the latch stops.