


Chapter 6 6-21
Removing and Replacing Parts
Removing and Replacing Drive Modules
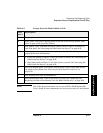
Errors and Troubleshooting
Removing/Replacing Parts
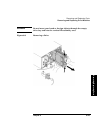
Removing and Replacing Drive Modules
Level of Difficulty: [2] Easy to Moderate
A drive module may be replaced in either of the following situations:
• The library is powered off during drive replacement, and the SCSI
bus chain is disconnected.
• The library is connected to the host, and the backup software can
access the functional drives. Though drives can be replaced without
disabling or interrupting most functions of the library, this feature
must be supported by the backup software. (If you download new
drive firmware, power cycle to activate the new firmware.)
NOTE If you are adding Ultrium drives to an existing DLT library, download
firmware first before you install the drive.
Drive Replacement Overview
These steps are documented in more detail on the following pages.
1. Determine which drive has failed (if you are replacing a failed drive).
2. Unload a tape from the drive, if possible.
3. Take the drive module offline or power off the library.
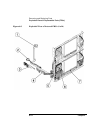
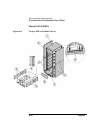
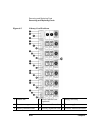
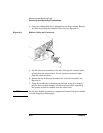
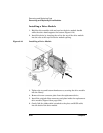
4. Remove the drive module.
5. Insert and connect the new drive module.
6. Bring the drive back online.
NOTE If the new drive has a different firmware revision than the drives that are
already in the library, the library could go into a partial availability state
due to a firmware mismatch. When this occurs, the front panel will
display
Partly Available, and the LED bar beneath the front panel display
will be solid amber. Download new drive firmware until all drives have
the same firmware revision.