


6-46 Chapter 6
Removing and Replacing Parts
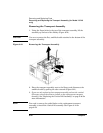
Removing and Replacing the Vertical Lift Assembly for Models 4/40, 6/
60, and 12/140
Removing and Replacing the Vertical Lift
Assembly for Models 4/40, 6/60, and 12/140
Level of Difficulty: [5] Difficult
Removing the Vertical Lift Assembly
NOTE The vertical lift assembly, although attached to the transport assembly,
is a separate FRU. The vertical lift assembly is only used in multi-level
libraries.
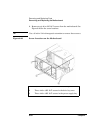
You must remove the transport assembly to access the vertical lift
assembly. See page 6-28 or page 6-35 for instructions on removing it from
the library.
Use the following steps to remove the vertical lift assembly:
1. Remove the transport assembly by following the steps on page 6-28 or
page 6-35.
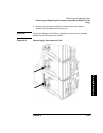
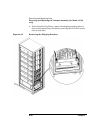
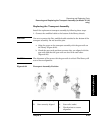
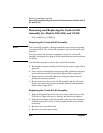
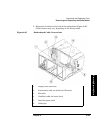
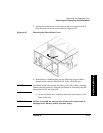
2. Once you have removed the transport assembly, disconnect the motor
power cable from the lift circuit board (Figure 6-24 on page 6-47).
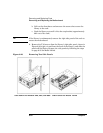
3. Disconnect the vertical lift cable by pressing the release tab and
pulling the connector outward.
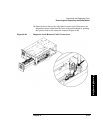
4. Remove the screws that secure the lift assembly and the lift circuit
board to the top of the transport assembly. Remove both assemblies
(Figure 6-24 on page 6-47).
Replacing the Vertical Lift Assembly
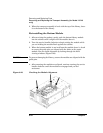
1. Align the lift circuit board with the screw holes, and insert two 4-20
T-10 screws. Tighten the screws securely, but do not over-tighten.
2. Align the screw holes in the lift assembly to the top of the transport
assembly. Install five 6-19 x .5 screws, tightening the motor mount
screws last.
3. Reconnect the vertical lift cable.
4. Reconnect the motor power cable.