


126
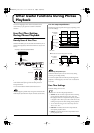
Other Useful Functions During Phrase Playback
* You can make the setting for Fade Out or Fade In only when
Line Thru is set to “ON.”
While making the Line Thru settings, you can play the
phrase selected before you made the settings by pressing the
PLAY button. This lets you verify the Line Thru operation as
you make the settings.
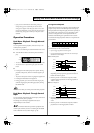
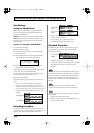
Procedure for Making Line Thru Settings
1.
Press the MODE button.
The MODE indicator lights up.
2.
Use the SELECT dial to choose “9.2 Line Thru,” then
press the dial.
3.
Turn the SELECT dial to choose Line Thru (OFF or ON),
then press the dial.
fig.20-g01e
4.
Turn the SELECT dial to set the Thru Volume (0 to
100%), then press the dial.
* You can make the setting for Thru Volume only when you
have selected Line Thru “ON.”
5.
Turn the SELECT dial to make the setting for Fade Out
(time: 00.5 sec to 59.9 sec), then press the dial.
fig.20-g02e
* You can make the setting for Fade Out only when you have
selected Line Thru “ON.”
6.
Turn the SELECT dial to make the setting for Fade In
(time: 00.5 sec to 59.9 sec), then press the dial.
* You can make the setting for Fade Out only when you have
selected Line Thru “ON.”
7.
When the prompt appears on the screen, press the
ENTER button to enable the settings.
To quit without making the settings, use the SELECT dial to
choose “No,” then press the ENTER button.
8.
When the prompt appears on the screen, press the
ENTER button to enable the settings.
To quit without making the settings, use the SELECT dial to
choose “NO,” then press the ENTER button.
When you’re finished making the setting, the display returns
to the setting item selection screen.
9.
Press the MODE button.
This ends the setting process and returns you to the usual
screen.
* While making the settings, you can go back to the previous
entry position (highlighted) by using the PAUSE (BACK)
button.
* Pressing the MODE button while making the setting displays
a prompt asking you whether you want to quit making the
setting. Note that choosing “YES” and pressing the ENTER
button returns you to the usual screen, discarding any
settings made up to that point.
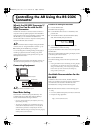
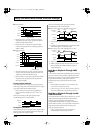
Adjusting the Sound Quality
During Audio Phrase
Playback (Equalizer)
The equalizer can be used to obtain the desired sound quality
for the playback of audio phrases. A setting of 0 dB produces
flat characteristics (the state of the original sound).
• Low: This adjusts the sound quality of the low band.
This performs adjustment within a range of -12 dB to +12
dB (Low Gain), with a reference frequency of 200 Hz or
400 Hz.
• High: This adjusts the sound quality of the high band.
This performs adjustment within a range of -12 dB to +12
dB (High Gain), with a reference frequency of 3 kHz or 6
kHz.
• Attenuation: Depending on the equalizer settings, sound
may be distorted. If this happens, set Attenuation within
a range of -12 dB to 0 dB. However, note that the output
level also drops when this value is set to anything other
than 0 dB.
Boosting the level of the low band (by shifting it more
toward the plus side) makes the bass more prominent. This
produces a heavier, more impressive sound. Lowering the
level of the low band (by shifting it more toward the minus
side) cuts the bass. This makes narration phrases and the like
easier to hear.
Boosting the level of the high band (by shifting it more
toward the plus side) makes the treble more prominent and
improves drop-out. Boosting it too much imparts a sharp
feel. Lowering the level of the high band (by shifting it more
toward the minus side) cuts the treble and produces a milder
sound. Lowering it too much imparts a muffled or murky
feel.
Procedure for Making the Equalizer Settings
1.
Press the MODE button.
The MODE indicator lights up.
AR-3000R_e.book 126ページ 2010年3月18日 木曜日 午後2時6分