Remote Programming
INTRODUCTION
3
3-3
NOTE
This section contains programming instructions for use with the IEEE-488
Interface (Option -05). For installation instructions, refer to the Options
and Accessories section.
3-1. INTRODUCTION
The IEEE-488 Interface turns the 8842A into a fully programmable instrument for use
with the IEEE Standard 488-1978 interface bus (IEEE-488 bus). With the IEEE-488
Interface, the 8842A can become part of an automated instrumentation system. The
8842A can be under complete, interactive control from a remote bus controller; or it can
be set to the talk-only mode, connected to a data logger or printer, and dedicated to a
single task.
This manual assumes you know the basics of the IEEE-488 interface bus. For an
introduction to the bus, request Fluke Application Bulletin AB-36, "IEEE Standard 488-
1978 Digital Interface for Programmable Instrumentation."
3-2. CAPABILITIES
The IEEE-488 Interface provides remote control of all front panel controls except for the
POWER, CAL ENABLE, and FRONT/REAR switches. Other features include:
• A simple and predictable command set
• Fast measurement throughput
• Full talk/listen capability, including talk-only operation
• Full serial poll capability, with bit-maskable SRQ
• Full remote/local capability, including local lockout
• EXTERNAL TRIGGER and SAMPLE COMPLETE connectors
• Remote calibration
• Programmable trigger sources, including two bus triggers
• Informative output suffix (suppressible)
• Selectable output terminators
The 8842A supports the following interface function subsets: SH1, AH1, T5, L4, SR1,
RL1, DC1, DT1, E1, PP0, and C0.
3-3. BUS SET-UP PROCEDURE
To set up the 8842A on the IEEE-488 bus, proceed as follows:
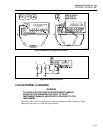
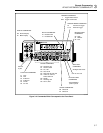
1. Turn the 8842A POWER switch OFF and set the 8842A IEEE-488 address using the
rear panel IEEE-488 address switches shown in Figure 3-1.
2. With the 8842A POWER switch OFF, plug the IEEE-488 cable into the 8842A rear
panel IEEE-488 connector.
3. Switch on the 8842A.


