


8842A
Instruction Manual
6-32
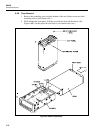
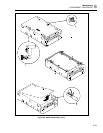
6-32. Front Panel Disassembly
1. Holding the chassis vertically (with the front panel downward), remove the mounting
screws from the four corners of the Display PCA (Figure 6-7A).
2. Holding the chassis vertically (now standing the instrument on the rear panel), pull
the front panel off the chassis and set it aside (Figure 6-7B).
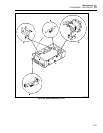
3. Remove the the display assembly (Display PCA, spacer matrix, and keypad) from the
chassis as follows (see Figure 6-7C):
a. Release the two plastic tabs on the front of the chassis.
b. Let the bottom edge of the display assembly swing toward the rear of the
instrument.
c. Pull the Display PCA toward the bottom of the chassis.
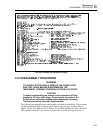
4. Separate the spacer matrix from the Display PCA by releasing the two pairs of plastic
snap tabs on the back of the Display PCA (Figure 6-7D).
5. Remove the keypad from the spacer matrix.
CAUTION
The vacuum fluorescent display should not be removed from
the Display PCA; these are supplied as one part.
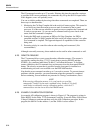
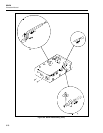
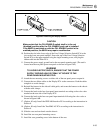
6. Remove the display window from the front panel as follows:
a. Slide the window upward (away from the buttons) about 1/32 inch (Figure 6-8A).
b. Push the window directly outward from the front panel (Figure 6-8B).
6-33. REASSEMBLY PROCEDURE
To reassemble the instrument, proceed as follows:
1. Assemble the front panel assembly by reversing the front panel disassembly
procedure (Figure 6-7). (It is easiest to lay the keypad on the Display PCA before
installing the spacer matrix on the Display PCA.)
CAUTION
The four Display PCA mounting screws are self-tapping. To
avoid damaging the threads, ensure the screws are threaded
properly before tightening. Do not overtighten them.
2. Turn the chassis upside down.
3. Install the Main PCA through the bottom of the chassis as follows: