


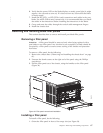
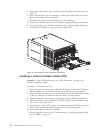

1. Remove the chassis door. (See “Removing and installing the chassis door” on
page 61.)
2. Power off the blade you are replacing by sliding the slider switch in the left
ejector to the right, to the off position.
3. Disconnect all cables from the CP blade you are replacing.
4. Unscrew the thumb screws from both ejectors using the Phillips screwdriver.
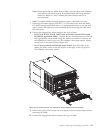
5. Lever open both ejector handles simultaneously to approximately 45 degrees
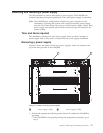
and pull the CP blade out of the chassis (see Figure 35).
Installing a control processor blade (CP8)
Attention: Follow ESD precautions (see “ESD precautions” on page xviii)
whenever handling a blade.
To install a CP blade (slot 4 or 5):
1. Open the ejector handles to approximately 45 degrees. Orient the CP blade so
that the handles are toward you and the flat metal side is on the bottom.
2. Align the flat metal side of the CP blade inside the left and right blade guides
in the slot. Slide the CP blade into the slot until it is firmly seated.
3. Tighten the thumb screws inside each handle using the Phillips screwdriver.
4. Turn the CP blade on by sliding the ON/OFF switch in the left handle to the
left, to cover the thumb screw.
5. Verify that the power LED is green. If not, ensure that the CP blade has power
and is firmly seated and that the ejectors are in the locked position.
6. Connect the cables to the new CP blade.
7. Remain logged in to the active CP and continue to“Verifying operation of the
new CP blade” on page 71.
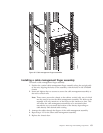
384b019
Figure 35. Removing the control processor (CP8) blade
70 SAN384B Installation, Service, and User Guide
|