


1. If the product needs to be transported a long distance, or if there are uneven
floors to cross, keep the product in its original packaging, and relocate the
entire shipment close to the installation location, using a pallet jack to lift and
move it.
Note: The standard packaging does not incorporate a wood pallet and pallet
brackets. The chassis sits on top of a plastic shipping tray.
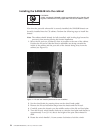
2. Once the shipment is in a location close to the installation, cut the bands that
encircle the packaging.
3. Lift the cardboard box off the chassis. Installation kits are packed within this
outer carton, so you may need to open the top of the box to remove the kits
or to press down on them as you lift the outer carton. Save the packing
materials if you are returning an old chassis.
4. Remove the port side exhaust kit, hardware accessory kit, chassis door, cable
management finger assemblies, and foam from the top of the chassis. Remove
the loose foam blocks from the corners of the chassis. Remove the anti-static
plastic from the chassis.
5. Place the kits and other installation pieces near the installation.
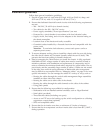
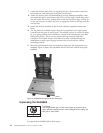
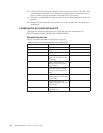
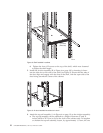
6. Move the lift tool next to the plastic shipping tray at the blower and power
supply end of the chassis. Position the lift tool with its left side next to the
shipping tray (see Figure 5).
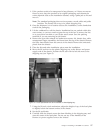
7. Using the lift tool winch mechanism, adjust the height of top of the load plate
to slightly below the bottom surface of the chassis.
8. Set the lift tool brake.
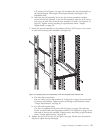
9. Carefully slide the chassis across the foam blocking in the shipping tray and
onto the center of the load plate. Do not use any of the handles on the
blowers or power supplies to move the chassis.
Figure 5. Lift tool positioned next to the chassis on the shipping tray
Chapter 2. Installing a SAN384B in a cabinet 17