


Downloading firmware from a USB drive
Firmware can be downloaded from a Brocade USB drive. The folder structure on
the USB device must be as follows in order to allow the device to be enabled:
brocade>
config
firmware
firmwareKey
support
The firmware folder contains the folder for the specific release you are installing.
1. Insert the USB drive into the USB port of the active CP blade.
2. Attach a serial cable from the PC to the active CP blade.
3. Log in to the active CP blade and enter usbStorage - e to enable the USB
device.
4. Remove the serial cable from the active CP blade and attach it to the standby
CP blade.
5. Enter firmwareDownload -s -U vX.X.X (where X.X.X is the firmware version
you are downloading) to download the firmware to the standby CP blade.
The -s option also disables the autoreboot, so you must manually issue a
reboot after the download finishes to initiate firmwarecommit. Enter all
requested information (use default values).
The -U option indicates that the download should come from the USB device.
If you do not use this option, you are prompted with Download from USB [No}:
Enter Y to download from the USB device.
6. When the download process finishes, type firmwareDownloadStatus to verify
that the firmware has been updated.
7. Ensure that you are still logged in to the standby CP blade (the blade for
which you just changed the firmware level) and type reboot. The reboot of the
standby CP will initiate a firmwarecommit to the secondary partition and log
you out.
8. Log back in to the standby CP blade and type firmwareDownloadStatus on
the standby CP blade to validate a successful commit. This may take up to 10
minutes.
9. Log out of the standby CP blade and log in to the active CP blade.
10. Type haShow and verify that the command output includes “HA enabled,
Heartbeat Up, HA State synchronized”. If not, re-enter the command until
you have verified that redundancy is achieved.
11. Type firmwareShow to verify that the firmware version has been updated and
that the versions are the same on the two CP blades.
12. Pack the faulty CP blade in the packaging provided with the new CP blade
for return to IBM, following local procedures.
13. Install the chassis door (“Removing and installing the chassis door” on page
61).
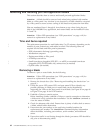
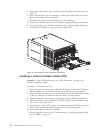
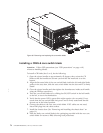
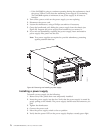
Removing and installing a CR4S-8 core switch blade
This section describes how to remove and install a core switch blade. The
SAN384B has two core switch blades: one in slot 3 and one in slot 6. Note that the
blade shown in Figure 36 on page 74 is shown with EMI plugs installed.
72 SAN384B Installation, Service, and User Guide
|
|
|
|
|
|
|
|
|
|
|
|
|
|
|
|
|
|
|
|
|
|
|
|
|
|
|
|
|
|
|
|
|
|
|
|
|
|
|
|
|
|