


6. Verify that the power LED on the blade displays a steady green light (it might
require a few seconds to turn on). If it does not turn on, ensure that the blade
is firmly seated.
7. Install the SFP, SFP+, or XFP (FC10-6 only) transceivers and cables in the port
blade. For mSFP (FC8-64 only) transceivers, it is recommended that you install
the cables in the transceivers before installing the transceivers in the blade.
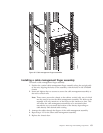
8. Group and route the cables through the vertical cable management fingers.
9. Install the chassis door.
Removing and installing blade filler panels
This section describes how to remove and install port blade filler panels.
Removing a filler panel
Attention: A filler panel should be removed only when being replaced with a
port blade or new filler panel. Any slot that is not occupied by a blade should be
occupied by a filler panel to ensure correct cooling of the chassis and protection
from dust.
To remove a filler panel, do the following:
1. Remove the chassis door (“Removing and installing the chassis door” on page
61).
2. Unscrew the thumb screws at the right end of the panel using the Phillips
screwdriver.
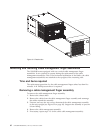
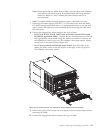
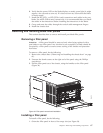
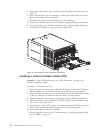
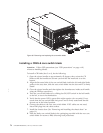
3. Pull the filler panel out of the chassis, using the handles on the filler panel
(Figure 34).
Installing a filler panel
To install a filler panel, do the following:
1. Orient the filler panel in front of the empty slot (see Figure 34).
384b018
Figure 34. Filler panel removal and installation
Chapter 5. Removing and installing components 67
|
|
|