


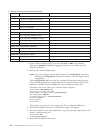
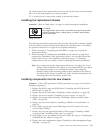

Table 18. Critical information checklist example
Checked? Data Notes
Configuration information
Location of "config-switch.txt" file:
Location of "config-miscinfo.txt" file:
IP address, subnet mask:
WWN for SAN384B:
SAN profile
Location of "SANbefor.txt" file:
Notes regarding nsShow output:
Notes regarding nsAllShow output:
Notes regarding switchShow output:
Notes regarding fabricShow output:
Output from supportShow command
Location of "spptshow.txt" file:
Notes regarding supportShow output:
Information about the new chassis
New factory serial number:
New serial number (if available):
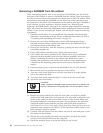
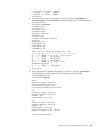
1. Open a Telnet session and log in to the SAN384B as admin. The default
password is password. Enable the logging function on your Telnet or serial
console connection.
2. Back up the current configuration.
Note: If you are using the virtual fabric feature, run configUpload -vf before
running the configUpload command in order to save the logical switch
configuration.
Enter configUpload -all; then enter the requested information at the prompts.
This command uploads the configuration to the customer-defined FTP server,
making it available for downloading. For more information about this
command, refer to the Fabric OS Command Reference Manual.
switch:admin> configupload -all
Protocol (scp or ftp) [ftp]: ftp
Server Name or IP Address [host]: 123.123.123.123
User Name [user]: Admin24
File Name [config.txt]: config-switch0.txt
Password: xxxxxxxx
Upload complete
switch:admin>
Alternatively, you can save the configuration file to a Brocade USB drive.
3. Record the SAN384B values on a workstation (steps 4 through 9)
4. Record the WWN value: Enter wwn; then, copy the command output into a file
named “config-miscinfo.txt”.
switch:admin> wwn
10:00:00:60:69:00:00:0a
5. Record the IP address information.
94 SAN384B Installation, Service, and User Guide
|
|
|||
|
|||
|||
|||
|||
||
|||
|||
|||
|||
|||
||
|||
|||
||
|||
|||
|
|