


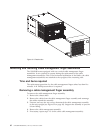
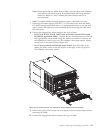
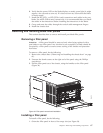
v For FC8-16, FC8-32, FC8-48, and FC8-64, port blades and the FX8-24 and
FCOE10-24 application blades Open the ejectors by pulling them toward
the center of the blade face. Pull the blade out of the chassis using the
ejectors (Figure 33 on page 65).
v For FC10-6 port blade and FR4-18i router blades: Unscrew the two
thumbscrews from the left and right ejectors on the blade using the Phillips
screwdriver. Open both ejectors simultaneously to approximately 45 degrees
and pull the blade out of the chassis.
11. If the blade is not being replaced by another blade, install a filler panel. See
“Installing a filler panel” on page 67.
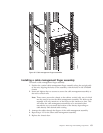
Installing a blade
To install a port blade, do the following:
Attention: Follow ESD precautions (see “ESD precautions” on page xviii).
Note: An FA4-18i routing blade and the SAN384B must have the same version of
firmware. To upgrade firmware versions, refer to the Fabric OS
Administrator’s Guide. See also “Fabric OS firmware updates” on page 43.
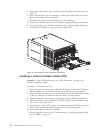
1. Orient the blade so that the ports are at the front of the chassis and the flat side
of the blade is on the bottom.
2. Perform the appropriate following action based on the type of blade:
v For FC8-16, FC8-32, FC8-48, and FC8-64, port blades and the FX8-24 and
FCOE10-24 application blades Adjust the ejectors to the open position, align
the flat side of the blade inside the left and right rail guides in the slot, and
slide the blade into the slot until it is firmly seated.
v For FC10-6 port blade and FR4-18i router blades: Open the ejectors to
approximately 45 degrees, align the flat side of the port blade inside the left
and right rail guides in the slot, and slide the blade into the slot until it is
firmly seated.
3. Perform the appropriate following action based on the type of blade:
v For FC8-16, FC8-32, FC8-48, and FC8-64, port blades and the FX8-24 and
FCOE10-24 application blades Adjust the ejectors to the closed position by
pulling them away from the center of the blade.
v For FC10-6 port blade and FR4-18i router blades: Close the ejectors by
pushing the handles toward the center of the blade until the ejectors lock.
The levering action of the handles seats the blade in the slot.
4. Perform the appropriate following action based on the type of blade:
v For FC8-16, FC8-32, FC8-48, and FC8-64, port blades and the FX8-24 and
FCOE10-24 application blades Tighten the left and right thumb screws using
the Phillips screwdriver.
v For FC10-6 port blade and FR4-18i router blades: Tighten the thumb screw
inside each handle using the Phillips screwdriver.
5. Perform the appropriate following action based on the type of blade:
v For FC8-16, FC8-32, FC8-48, and FC8-64, port blades and the FX8-24 and
FCOE10-24 application blades Skip to step 6.
v For FC10-6 port blade and FR4-18i router blades: Turn the blade on by
sliding the slider switch in the left ejector to the left, covering the thumb
screw.
66 SAN384B Installation, Service, and User Guide
|
|
|
|
|
|
|
|
|
|
|
|
|
|
|
|