


Table 4. Installation tasks, time, and items required (continued)
Installation task Time estimate Items required
Installing an Ethernet cable,
opening a Telnet session, and
configuring the SAN384 B
domain ID, date and time,
and additional system
parameters. Verifying and
backing up the configuration.
20 minutes Ethernet cable for Telnet
access. Refer to the Fabric OS
Administrator’s Guide.
Installing SFP, SFP+, mSFP,
and XFP (10-Gbps) optical
transceivers as needed
15-30 minutes (depending on
port blades installed)
Optical transceivers.
Attaching fiber optic cables,
cable wraps, and cable
guides
2-3 hours Fiber optic cables and cable
wraps.
Disassembling and packing
the lift tool
20 minutes No special tools required.
Unpacking and assembling the lift tool
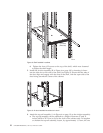
Assembling the lift tool before starting the installation will simplify the installation.
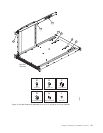
The lift tool consists of several parts, including:
v The fully assembled main vertical section of the lift tool with wheels, wheel lock,
cables and winch attached
v Attachable lift forks, which slide onto the front of the lift tool and are secured in
place by spring-loaded pins and ring pins
v 24-inch load plate with sliding middle section (ordered separately to use in place
of the 18-inch solid single-piece load plate)
v Anti-tip bars
v Retention straps
v Wheel chocks
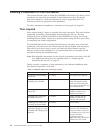
Assembly instructions are attached to the back of the main vertical section of the
lift tool. The following supplemental information may help with the assembly.
1. With one person at either end, lift the main section of the lift tool out of the
shipping crate.
2. Review the assembly instructions attached to the back of the lift tool, if
necessary.
3. With the lift tool still horizontal, insert the two legs with caster wheels into
the holes in the front of the lift tool.
4. Pull up on the spring-loaded leg lock pins, sliding the legs in until the pins
snap into place through the holes in the legs, securing them in place.
5. Tilt the lift tool upright, resting on all four wheels. Set the wheel brake, if
desired, by stepping down on the brake pedal. (Note the brake release on the
left side of the brake pedal.)
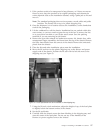
6. Attach the two forks to the lift tool, sliding the two holes in each over the
ends of the two bars. If the winch is in the lowest position, you may need to
raise it to provide enough clearance to slide the forks into position. Secure
each lifting fork in place with two ring-pins.
Chapter 2. Installing a SAN384B in a cabinet 15
|
|
|
|
|
|