


v Phillips screwdriver
v Small form factor pluggable (SFP) transceivers (as needed)
v Optical cables (as needed)
Procedures
Follow the links in the steps below to complete this installation:
1. Verify that the port blade is the correct part: 21R9996 for the 16-port blade,
21R9997 for the 32-port blade, and 21R9998 for the 48-port blade.
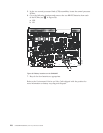
2. Verify which slot to install the blade. Slots are numbered from one through
eight, from bottom to top, when facing the port side of the SAN384Bs. Port
blades can be installed in any of the slots 1, 2, 7, or 8.
3. We recommend having the latest firmware version on the CP blade. The
firmware version should match on both the active and the backup CP blades. If
the firmware is not at the latest level, obtain new code from the code download
website, and install it prior to installing the port blade. See “Fabric OS
firmware updates” on page 43 for instructions.
Note: Firmware downloads require that Ethernet connections be made to both
CP blades. Procedures for downloading and installing firmware are
described in the Fabric OS Administrator's Guide.
4. Remove the filler panel or port blade. Refer to “Removing a blade” on page 64
or “Removing and installing blade filler panels” on page 67.
Attention: A filler panel should be removed only when being replaced with a
port blade or new filler panel. Any slot that is not occupied by a port blade
should be occupied by a filler panel to ensure correct cooling of the chassis and
protection from dust.
5. Follow the instructions for “Installing a blade” on page 66.
6. Follow the instructions for “Removing and installing transceivers” on page 81.
Because of port density, it may be easier to remove and install the SFPs while
the 32-port or 48-port blade is out of the chassis. However, you must handle
the blade carefully while it is out of the chassis to avoid damaging it.
7. Install, group and route the cables as desired. See “Managing cables” on page
42 for additional cabling instructions.
Attention: Do not route cables in front of the exhaust vent, which is located at
the top on the port side of the chassis.
8. Verify the installation. For information about how to check the status of
hardware components using the CLI, see the Fabric OS Administrator's Guide,
which is located on the product documentation CD.
108 SAN384B Installation, Service, and User Guide