


The initial physical hardware installation continues with the following steps:
v “Providing power to the SAN384B” on page 35
v “Connecting the SAN384B and host with a serial cable” on page 35
v “Logging in to the serial console port” on page 36
v “Configuring the IP addresses” on page 36
v Installing optical transceivers and cables (see “Removing and installing
transceivers” on page 81 and “Managing cables” on page 42)
The following additional steps are customer responsibilities required for the initial
configuration:
1. Establish an Ethernet connection. See “Establishing an Ethernet connection” on
page 38.
2. Specify a switch name. See “Customizing the switch name” on page 38.
3. Specify a domain ID for the SAN384B. See “Setting the Domain ID” on page
39.
4. Set the date and time. See “Setting the date and time” on page 39.
5. Connect to the fabric. See “Verifying the PID mode and connecting to the
fabric” on page 41
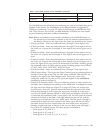
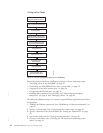
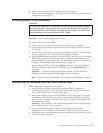
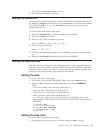
Configuration Tasks
Connect Serial Cable
between Switch and Host
Log In to Serial Console Port
Set IPAddress
Log off Serial Console Port
and Disconnect Serial Cable
Connect Ethernet Cable
and Open Telnet Session
Set Domain ID
Set Date and Time
Install SFPs and
Attach Cables
Manage Cables
Verify Operation and
Back Up Configuration
384b004
Figure 17. Flow of configuration tasks for the SAN384B
34 SAN384B Installation, Service, and User Guide
|
|
|
|