


Chapter 1 Server Installation
I-12
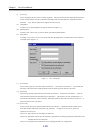
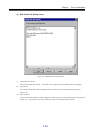
(ii) SMTP Server
In [SMTP Server], specify the SMTP server to which mails are sent within 235 characters.
(iii) SMTP Port
In [SMTP Port], specify the port number of the SMTP server to which mails are sent.
A value from 1 to 65535 can be specified. The default value is 25.
(iv) POP Server
In [POP Server], specify the POP server to access for authentication when sending mails within 235 characters.
This item is effective if you specify [POP before SMTP] for (i) [Authentication].
(v) POP Port
In [POP Port], specify the port number of the POP server to access for authentication when sending mails.
A value from 1 to 65535 can be specified. The default value is 110.
This item is effective if you specify [POP before SMTP] for (i) [Authentication].
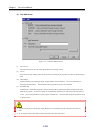
(vi) User Name
In [User Name], specify the user name for authentication within 32 characters.
This item is effective if you specify either [POP before SMTP] or [SMTP-AUTH] for (i) [Authentication].
(vii) Password
In [Password], specify a password of the user name for authentication within 58 characters.
This item is effective if you specify either [POP before SMTP] or [SMTP-AUTH] for (i) [Authentication].
(viii) Password Confirmation
Enter the same password in [Password Confirmation] for confirmation.
This item is effective if you specify either [POP before SMTP] or [SMTP-AUTH] for (i) [Authentication].
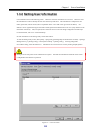
(ix) Mail Header File
In [Mail Header File], specify the header file which is a template for sending a mail within 235 characters.
(x) [Browse] button
Displays the file selection screen on which you can specify an existing mail header file.
(xi) [Edit] button
Enables the creation of a new mail header file or the editing of an existing mail header file. Enter the path in
the [Mail Header File] field and click the [Edit] button. The Mail Header File Setting screen (Figure 1-9)
appears. Edit the contents and click the [Save] button or [Save as] button.
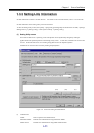
(xii) Link List
Displays the list of currently set link items.
(xiii) [Add] button
Displays the Link - Add screen (Figure 1-10) on which you can add link items.
(xiv) [Delete] button
To delete a link item, select the one you want to delete and click the [Delete] button.
(xv) [Edit] button
Select a link item and click the [Edit] button, or double-click the link item. The Link - Add screen (Figure
1-10) appears for changing link items.
(xvi) [Update Event Link Operation] button
A message is displayed asking if you want to apply new settings. If iSM is operating, selecting the [Yes]
button immediately applies the new settings. If iSM is not operating, only event link information is updated,
and the new settings become valid when iSM is started next time.