


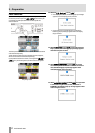

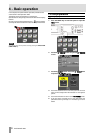

20 TASCAM HS-4000
2 − Names and functions of parts
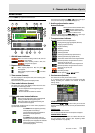
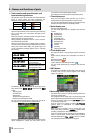
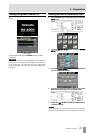
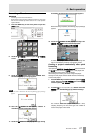
39 Time bar
This shows the playback position of the currently playing
entry or playlist.
Otherwise, this is the same as on the Home Screen in take
mode.
40 File or title name (button)
The currently active playlist entry number is shown inside
the icon.
Blank: CF card not available or loading
000: No entry
Three–digit number: The number of the currently
selected entry
The name of the currently active entry is shown to the right
of the icon. If the title has been set for the corresponding
entry in the playlist, that title is shown.
A “*” appears in the icon if the playlist has not been saved
after editing (including the addition and removal of entries).
Touch this area to open a pull-down menu.
ASSIGN FILE button
This shows the ASSIGN screen where you can assign files.
(See “Assign File screen” on page 60.)
ENTRY LIST button
This shows the entry list (ENTRY) screen. (See on page 60.
Entry list screen )
ADJUST ENTRY button
This opens the ADJUST ENTRY *** screen where you
can edit an entry. (See Editing entry titles on page 63,
Edit the playback starting time on page 64, Editing
the playback starting point on page 65 and Editing
the playback end point on page 66.)
SAVE A+B button
This saves the current playlists. This can only be selected
when stopped. (See Saving a playlist on page 67.)
SAVE AS(A) or SAVE AS(B) button
Use this to name and save the currently selected player s
playlist. This can only be selected when stopped. (See on
page 67. Saving a playlist )
EXPORT PPL button
Create a JPPA PPL file from the current playlist. This can
only be selected when stopped. (See “Creating a JPPA PPL
file from the loaded playlist” on page 68.)
41 Level meters (button)
The playback level is shown.
Touch this area to enable monitoring of a playlist.
When selected for monitoring, the area around the meters
appears yellow.
When an input overloads, the corresponding
L or R appears
red.
42 Mark name
This is the name of the mark at the current time or the
nearest preceding mark. This is the same as on the Home
Screen in take mode.
43 Mark List button
Touch this button to open the mark list for that player. This
is the same as on the Home Screen in timeline mode.
44 Manual Locate button
Touch this button to open the MANUAL LOCATE screen for
that player. Otherwise, this is the same as on the Home
Screen in timeline mode.
45 MON A+B button
When ON, the button is highlighted in blue and meters for
both players are highlighted. When first turned OFF,
monitoring is disabled for both players.
46 Monitoring mixer overload indicator
If the left or right channel of the monitoring mixer overloads,
the background of the corresponding L or R will appear red.
47 Audio synchronization status
(button/indicator)
This is the same as on the Home Screen in timeline mode.
48 Time code status (button/indicator)
This is the same as on the Home Screen in timeline mode.
49 Flash Page number and knob
This is the same as on the Home Screen in take mode.
However, touching this in the unselected player will, in
addition to enabling flash page selection, also assign the
transport keys, ONLINE key and JOG/SHUTTLE dial on the
front panel to the corresponding player.
50 SELECT button
Touch this button on a player to assign the transport keys,
ONLINE key and JOG/SHUTTLE dial on the front panel to
the corresponding player.