


TASCAM HS-4000 11
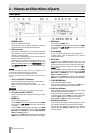
2 − Names and functions of parts
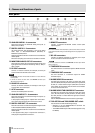
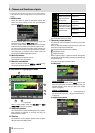
12 REC key/indicator
When a recordable CF card is installed and the unit is
stopped in timeline mode, press this key to put the unit into
recording standby. Both the PAUSE and REC keys light
during recording standby.
In timeline mode, press the PLAY key while pressing and
holding the REC key to start recording from that point.
Both the PLAY and REC keys light during recording.
13 ONLINE key/indicator
Press to turn online playback mode on/off. The indicator
lights when on and is unlit when off. (When dual playlist
mode is active, the indicator reflects the currently selected
player.)
The switch has a cover to prevent misoperation. Open the
cover from below to access and operate the switch. (See
“Online functions” on page 89.)
14 PHONES knob/jack
Connect stereo headphones to this standard stereo phone
jack.
This jack outputs the signal from the internal monitoring
mixer.
Use the PHONES knob to adjust the headphones output
level.
CAUTION
Before connecting headphones, turn the PHONES knob to the minimum
volume. Failure to do so could cause sudden loud noises to occur, which
might damage your hearing or equipment.
15 KEYBOARD connector
Connect an IBM PC-compatible keyboard with a PS/2
interface here, and use it to input project and session names,
for example.
By default, the unit is set to use Japanese keyboards, which
have a different layout from US keyboards. To use a US
keyboard, change the setting on the
PREFERENCES page
of the
SYSTEM SETUP screen. (See “PREFERENCES page” on
page 80.)
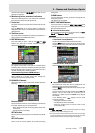
16 PROJECT key
Press to open screens related to projects (PROJECT selection,
SESSION selection, AES31 file selection, TAKE selection and
PLAYLIST selection screens). The last used project-related
screen opens.
(See “PROJECT screen” on page 32.)
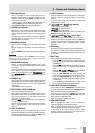
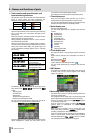
17 EXIT/CANCEL (PEAK CLEAR) key
Press to cancel input or item selection.
When a pull-up or pull-down menu is open, press to close it.
On the Home Screen, when no pull-up/pull-down menu is
open, this key functions as a reset button for peak hold
marks shown on the level meters
When the
MENU screen or project screen is open, press this
to return to the Home Screen.
On other screens, press this to return to the previous screen.
When a pop-up window is open, press this to cancel an
operation.
18 CALL [CHASE] key
Press to locate to and pause playback at the call point,
which is where playback last started from playback standby.
Press this key while pressing and holding the SHIFT key to
turn synchronization with timecode ON/OFF.
19 LCD TILT button
Press this button to unlock the color display, so that you can
adjust its angle by pulling the bottom of the display
outward.
To put the display away, press this button to unlock it and
push the bottom inward.
20 m[ ] and ,[ ] keys (search)
Press one of these keys to search.
m[
] key: search backward
,[
] key: search forward
Press one of these keys while pressing and holding the
SHIFT key to search at high speed.
21 .//[MARK.//] keys (skip)
Use these keys to skip between regions, takes and entries.
Press these keys while pressing and holding the SHIFT key
to move to the previous/next mark. After moving, the same
playback state resumes (stopped/playback standby/
playback).
22 MARK key
Press this key to add a mark at the currently located time.
The maximum number of marks, including automatic marks,
possible in a single session/take is 99. (See “Mark functions”
on page 84.)
23 SHIFT key
When stopped/in playback standby/during playback:
・ Press the . key while pressing and holding this key to
move to the previous mark, and resume the same
playback state.
・ Press the / key while pressing and holding this key to
move to the next mark, and resume the same playback
state.
・ Press the m [
] or ,[ ] key while pressing
and holding this key to search at high speed.
・ Press the JOG (SHUTTLE) key while pressing and
holding this key to activate the shuttle operation mode.
・ Press the STOP (RETAKE) key while pressing and
holding this key to retake the recording (erasing the last
recorded take).
・ Press the CALL key while pressing and holding this key
to turn synchronization with timecode ON/OFF.
24 JOG (SHUTTLE) key and indicator
Use to enable use of the JOG/SHUTTLE dial. Press this key
to enable the jog operation mode of the JOG/SHUTTLE dial.
When this mode is enabled, this indicator lights.
Press this key while pressing the SHIFT key to enable the
shuttle operation mode of the JOG/SHUTTLE dial. When
this is enabled, this indicator blinks.
Press this key again to disable either mode.
25 JOG/SHUTTLE dial
When in jog operation mode, turn this to change the
playback position by a corresponding amount.
When in shuttle operation mode, turn this to adjust the
playback speed according to the degree of rotation.
If you return to the original position when in shuttle
operation mode, the transport status is restored to how it
was before shuttle playback was begun.