


TASCAM HS-4000 17
2 − Names and functions of parts
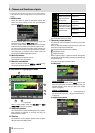
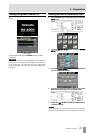
Press this area to open the
CF SELECT screen. (See “CF card
selection” on page 26.)
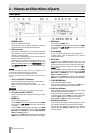
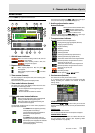
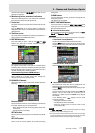
16 Monitoring mixer overload indicators
When the monitoring mixer L or R channel has overloaded,
the background of that channel appears red.
17 Zoom rate
This shows the track area zoom ratio and extent of the area
displayed.
Turn the DATA dial to the right to zoom in (reduce the
displayed area) and turn it to the left zoom out (increase the
displayed area).
18 Timeline cursor
This cursor shows the position of recording or playback. It is
always shown in the middle of the screen.
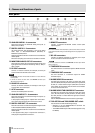
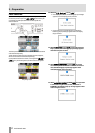
19 REC/MON button
Press this button to open a pull-up with REC and MON
buttons that allow you to enable recording and input
monitoring for the tracks.
Record arm buttons (REC buttons)
These buttons arm tracks for recording.
The signals of tracks that are armed are recorded during
recording. When a channel is armed for recording, the signal
from the assigned input connector is input when the unit is
stopped, recording or in recording standby.
Input monitoring button (MON buttons)
These buttons enable/disable input monitoring.
When enabled for a channel, sound input through the
assigned input connector is always input.
20 BOUNCE I/O button
Touch this button to open a pull-up with buttons related to
bouncing.
Bounce button
Touch this button to bounce. In the following circumstances,
this button appears gray and cannot be used.
・ When both starting (IN) and ending (OUT) points have
not been set
・ During playback or recording
SET IN button
Touch to set the current position as the bounce starting (IN)
point.
SET OUT button
Touch to set the current position as the bounce ending
(OUT) point.
CLEAR button
Touch to discard the currently set bounce starting (IN) and
ending (OUT) points.
(See “Bouncing” on page 48)
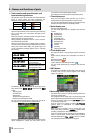
21 NEXT TAKE NAME button
Touch this button to open the NEXT TAKE NAME page
where you can set the name that will be given to takes or
files recorded in the future.
● First half of take names
The first half of the take name can be set to either the User
Word
or the Session Name (default).
CAUTION
The first half of the take name can only be changed when the unit is stopped.
“User Word” mode (button)
Use the user word for the first half of the take name.
Press the
EDIT button to open the screen where you can
change the user word. (This works the same as the screen
for editing project names.)
“Session Name” mode (button)
Use the session name as the first half of the take name.
● Second half of take names
The second half of the take name is comprised of one
alphabetical letter and a three-digit number.
Press the
EDIT button to open the screen where you can
change the letter.
You can change the three-digit number with the
+ and –
buttons. You can also touch the numerical part to
highlight it in yellow and use the DATA dial to change
the number.
In the following cases, “
---” appears and the value
cannot be changed.
・ No project or session is loaded
・ The selected CF card is unavailable
・ When the numerical part of the file name of the
current take is 999
NOTE
The Next Take Name setting is saved with each project. If you change
projects, the setting of the loaded project is used.
The numerical part of the second half of the take name can be changed
even during playback and recording. (The first half of the take name and
the letter in the second half can only be changed when stopped.)