


88
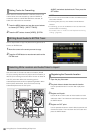
Using Play List: Simplified Voice-Over
Simplified Voice-Over
This function allows you to make voice-overs and give priority to the voice-over during playback. Recording is performed on one
or two channels. The channel input during recording can be mixed with the playback sound.
◆ NOTE:
• The voice-over data is written to the same card storing the play list.
Thus the play list must be saved before audio recording or an error
will be generated and recording cannot be performed.
• The maximum recording time is 720 minutes.
•The maximum number of voice-overs is 99.
• Check the remaining time on the P2 card before saving the play list.
Otherwise there may not be enough time for the voice-over
recording. When the P2 becomes FULL, an error occurs and
recording cannot be started.
Make the required settings in the related setup menu prior to
audio recording.
➝For details on settings, refer to “Setup” (page 106).
Select the voice-over track from one of the following tracks in
setup menu No. 792 (A DUB CH):
CH1, CH2, CH3, CH4, CH1+2, CH3+4
◆ NOTE:
• Recording tracks can be selected when the play list does not
contain any voice-overs. When it does contain a voice-over,
subsequent voice-overs use the same recording track.
You can select whether to mix the playback sound during a
voice-over in setup menu No. 793 (A DUB PB MIX).
When mixing is selected, select the channels to mix in setup
subscreen.
The playback sound of the selected channels is mixed with A
DUB CH and recorded.
When there are multiple A DUB CH, make separate settings
for each.
◆ NOTE:
• In play list playback, playback level is set to UNITY fixed, or
registered recording level and cannot be changed. However, EE
audio while the A.DUB button is pressed and during A.DUB can be
adjusted.
• The playback level of short playback of voice-overs from still status
cannot be changed.
In setup menu No. 796 (A DUB FADE), select whether the
voice-over should be blended with the original audio using cut
or V-fade.
➝Refer to “Playing Back the Play List” (page 94).
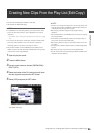
➝Refer to “Creating New Clips From the Play List (Edit Copy)”
(page 95).
◆ NOTE:
•When an audio is overwritten and added using cut to an audio
added by V-fade, V-fade will be applied to the connecting point.
In setup menu No. 797 (A DUB MONI), select whether the
audio being recorded should be output during the voice-over.
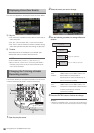
Connect a microphone to analog CH2 and mix the
microphone input with CH2 playback audio and use cut
processing to record on CH2. Use headphones to listen to the
playback audio during recording.
◆ NOTE:
•Input a reference signal when mixing SDI input audio.
•IEEE1394 input audio cannot be used for voice-overs.
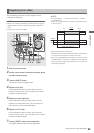
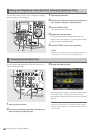
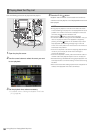
Preparing for Voice-Over
Selecting a Track for Recording
Mixing Playback Sound
Selecting Method for Connecting Audio IN
and OUT Points
Setting Output Voice During A DUB
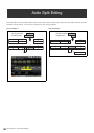
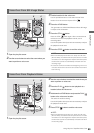
Setup Example
Selecting recording tracks A DUB CH = CH2
Selecting mixing with playback
sound
A DUB PB MIX = ON
CH2 MIX = CH2
Selecting audio connection A DUB FADE = CUT
During simultaneous A DUB
setting
A DUB MONI = OFF