


66
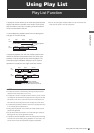
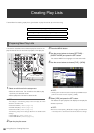
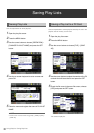
Using Play List: Play List Function
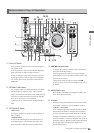
6.IN + 9.OUT buttons
Pressing the IN and OUT buttons simultaneously will
show the duration between the IN and OUT points. If
an OUT point has not been registered, it will show the
duration up to the current location. (In the playback
screen)
10.SHIFT + 6.IN + 9.OUT buttons
Holding down the SHIFT button and pressing the IN
and OUT buttons will show the total time (TOTAL
DURATION) for all events. (In the playback screen)
For details on other operations, refer to the
descriptions of 7. ENTRY button, 12. TRIM+ / – button,
17. RESET button and 19. GO TO button.
7. ENTRY button
7.ENTRY + 16.IN / 9.OUT buttons
During insert editing in the insert mode, hold down the
ENTRY button and press the IN or OUT button where you
want to register an IN or OUT point in the event
registration/revision mode (and the EVENT button is on or
flashes). When an OUT point has been registered in a
new event, it automatically becomes possible to register
a new event (auto event increment function).
Registering an OUT point but no IN point in a clip
automatically makes the beginning of that clip the IN
point.
In overwrite editing, selecting three of the four IN and OUT
points in a play list and in an overwriting video will register
the event as an unfinalized event.
The playback location can be registered as an IN or OUT
point also in the play list.
7.ENTRY + 22.SPLIT buttons
Use these buttons for splitting audio. In the event
register/edit mode (when the EVENT button is on), hold
down the SPLIT button and press the ENTRY button.
The location where the button was pressed will
become the audio split IN point.
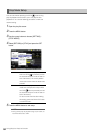
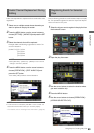
8. CLIP ➝ LIST button
Use this button to import a clip selected in the
thumbnail screen into the play list. Select a clip in a
thumbnail display (multiple clips can be selected) and
switch to the play list display. Hold down the SHIFT
button and press the ENTRY button and the beginning
of the clip at the cursor position in the play list
becomes the IN point and its end point becomes the
OUT point.
9. OUT button
Pressing the OUT button will show the time code value
for the registered point. (In the playback screen)
10.SHIFT + 9.OUT buttons
In the overwrite edit mode, hold down the SHIFT button
and press the OUT button to change the P OUT
(player) and R OUT (recorder) points. Each press of
the button changes the indication between P OUT ➝ R
OUT ➝ OFF. Use the 12. TRIM +/– button to change
the time code as necessary. Press 2.SET or 7.ENTRY
after completing all changes. (When the play list is
displayed in overwrite edit mode)
For details on other operations, refer to the
descriptions of 7. ENTRY button, 12. TRIM+ / – button,
17. RESET button and 19. GO TO button.
10.SHIFT button
11.+ / – button
In the play list, press this button to zoom in (+) or zoom
out (–) the time line.
12.TRIM + / – buttons
Use these functions to change play list events. Select
the event you want to change in the play list, hold down
the IN, OUT and SPLIT buttons and press the TRIM+/–
button to change the color of the IN, OUT and SPLIT
points. Use this button to increment (+) and decrement
(–) the IN, OUT or SPLIT point one frame at a time. Then
press ENTRY to return to the original color and apply
the change.
◆ NOTE:
• At a 24PN frame rate, the frame rate can be changed in
multiples of 4 frames.
13.UNITY/VAR/channel select switches and audio
playback level controls
• Use to select playback signal channels and perform level
control during audio level adjustment and voice-overs.
◆ NOTE:
• Levels are not adjusted during play list playback.
14.A. DUB button
Use to make voice-overs and to copy to EXTRA.
➝For details, refer to “Simplified Voice-Over” (page
88).
15.STILL/PAUSE button