


18
Introduction: Control Reference Guide
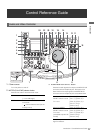
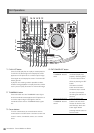
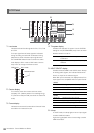
4. METER SELECT switch
Switches to CH1-4 or CH5-8 in the audio meter and the
monitor.
5. INPUT SELECT buttons
Switch between video and audio input signals. You
can also switch the input signals to internal signals
selected in setup menu No. 601 (VIDEO INT SG).
6. AUDIO REC VOL SEL switch
UNITY/VAR switch
Audio level controls
Use these controls to adjust the recording levels of the
audio signals (CH1/CH2/CH3/CH4). However, the
recording level cannot be adjusted during 1394 input.
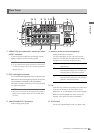
7. POWER indicator
Lights when the power is on.
8. Search dial
Use to search and check video. Each press of the dial
alternates it between SHTL (shuttle) mode and JOG
mode. When the power is turned on, the search dial will
not operate unless it is first returned to the STILL
position.
9. Audio playback level controls
Adjust the playback level of audio signals (of channels
selected using the UNITY/VAR channel select switch).
However, they cannot adjust the playback level of
1394 output signals. CH5 to 8 are at all times played
back at a fixed level.
10.UNITY/VAR channel select switches
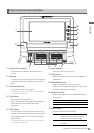
11.PC button
Switches between the USB host mode for connecting
to a hard disk drive and the USB device mode for
connecting to a personal computer.
Press this button to open the mode selection screen on
the LCD monitor and select the desired mode.
➝For details, refer to “Using USB Connectors” (page
96).
12.CONTROL switch
Use this switch to enable remote control of this unit via
the 9-pin REMOTE.
13.FF/NEXT buttons
Press to fast forward. Select the speed in setup menu
No. 102 (FF. REW MAX). In the playback mode, hold
down the SHIFT button and press the FF button to
move to the beginning of the next clip.
During GUI display (thumbnail display and play list
display), hold down the SHIFT button and press the FF
button to move to the last thumbnail or event.
14.A. DUB button
Press this button to make a voice over recording in the
play list mode, or to overwrite copy an event audio to
an EXTRA track.
➝For details, refer to “Simplified Voice-Over” (page
88), and “Writing Event Audio to EXTRA Track”
(page 80).
15.REC button
Press this button and the PLAY button simultaneously
to start recording. Press this button during playback
VIDEO: Each press of the VIDEO button switches
the input video signal in the following
order: [CMPST] ➝ [SDI] ➝ [1394] ➝ [SG].
When SG is selected, the signal switches
to the internal signal selected in setup
menu No. 601 (VIDEO INT SG).
AUDIO: Each press of the AUDIO button switches
the input audio signal in the following
order: [ANALOG] ➝ [SDI] ➝ [SG]. When
VIDEO is set to 1394, AUDIO is forcibly set
to 1394.
UNITY: Records the audio signals at a fixed level
regardless of the positions of the audio
level controls.
VAR: Records audio signals at the level set with
the audio level controls.
UNITY: Plays back audio signals at a fixed level
regardless of the positions of the audio
level controls.
1(2): Plays back and outputs audio CH1(2) at
the level adjusted using the audio level
controls to CH1(2) and at a fixed level to
CH3(4).
1+3
(2+4):
Plays back and outputs audio CH1(2) and
CH3(4) at the level adjusted using the
audio level controls to CH1(2) and CH3(4).
3(4): Plays back and outputs audio CH3(4) at
the level adjusted using the audio level
controls to CH3(4) and at a fixed level to
CH1(2).