


Addendum
PRV-LX1 Operating Manual
(1) Precautions when starting (Page 6)
After powering off the unit, the orange indicator light located next to the power button will illuminate. Please
wait a minimum of 2 seconds before restarting the unit.
(2) HDD Tools (Page31)
To format the internal HDD (this process will delete all user data, video & audio recording to the HDD),
please select the HDD as the target drive. The FORMAT command is unavailable when drive, DVD1 or
DVD2, is selected.
(3) Composite / RCA Output (page31)
The only way to view pass-through E-to-E (non-encoded) video and audio from the video source through
the LX1 to is on the composite and RCA terminals. (This is done by selecting the Source Monitor setting
in the GUI, as shown above.) This is true even if the LX1 is set up to record signals coming in through
other AV inputs. When the Source Monitor setting is selected if the On Screen Display is activated, the
output to the monitor will switch from pass-through to the decoding signal.
(4) Input Selection (Page 32)
LPCM audio encoding is not available when selecting DV as an input.
(5) Input Selection (Page 32)
When the following status is changed, DV audio format auto-detection is issued. While this auto-detection
is running(approximated 2-3 seconds), the preview and recording options are not available for 2-3 seconds
under the following conditions:
1. Change the input device setting
2. Change the recording setting
3. Immediately after connecting a DV cable or right after playing video on a connected DV device.
*Note: Pressing PREVIEW after performing one of the above actions (1-3), causes a message,
“No DV Input”, to display on the monitor during the 2-3 second auto-detection process.
This is not an error.
(6) Other Recording Setting (Page 34)
LPCM audio encoding is not available when selecting DV as an input.
(7) External Sync Function (Page 48)
When enabling DV OUT in the SET UP section [Operation]-[DV OUT], the External Sync automatically
changes to "Disabled". However, setting the [DV OUT] to "Disabled", does not change the External Sync
setting.
(8) Font selection (Page 50)
When Japanese is used in a Clip Name, Chapter Name or Disc Name, a Japanese font (Mincho-tai) is
used for the DVD Menu including text and numbers.
(9) Importing Image Data, Edit Lists (Page 63)
When selecting a drive, DVD1 or DVD2, as a [Source] for Importing Image Data and Edit Lists, insert the
disc first then select the drive. The drive does not refresh the [Source File] when the disc is inserted after
the drive is selected.
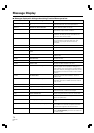
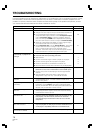
(10) Messages Displayed in Dialogue Box during Function menu Operation (Page 75)
Item Message Comment
Project –
CopyClip
No target Clip is
selected.
Select a clip for coping.
The same message will appear in case of copy clip operation to the
project which already has 255 clips in it.
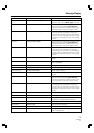
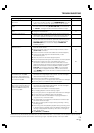
(11) Messages displayed in the Dialogue Box during an EDL Recording Operation (Page 76)
Item Message Comment
Recording Stop operation is
needed to finish
IN/OUT recording.
Record of the previous clip ended with a Pause command.
The Auto-capture process does not stop until the Stop button is pressed
or a -Stop command (REC STOP) is issued from the EDL.