


15
PRV-LX1
En
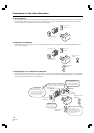
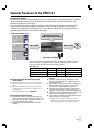
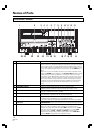
Names of Parts
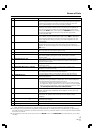
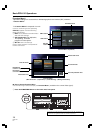
No.
9
10
11
12
13
14
15
16
17
18
19
20
21
22
23
24
25
26
Name
PREVIEW button
STOP button (7)
PLAY button (3)
PAUSE button (8)
REC button (¶)
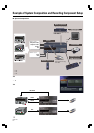
MOUSE/KEYBOARD connectors
STEP FWD button (E)
STEP REV button (e)
SCAN/SKIP FWD button (¡/¢)
SCAN/SKIP REV button (1/4)
ENTER button
CURSOR buttons
Filter cover (2)
FUNCTION button (*3)
DISPLAY button
Remote control sensor (Î)
VOLUME knob
PHONES jack
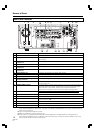
Function
When this button is pressed with the unit in the idling condition, a
preview image/sound of the selected input (following encode and decode
processing) is supplied to all output connectors except DV; when the
button is pressed again, the unit returns to idling condition.
Functions to stop recording or playback. Until all internal operations are
completed, the indicator flashes (white), and when fully completed, the
unit returns to the idling condition and the indicator lights (white). Also,
pressing the STOP button while holding the CURSOR (bottom pointing
arrow) button depressed functions to switch between progressive
encoding ON/OFF. (*1)
When this button is pressed, playback begins from selected source (DVD
drive or HDD), and the indicator lights (white). When HDD is designated
as the recording destination and time shift recording has been set, this
button responds even during recording, and initiates playback from the
recording start.
When pressed, recording or playback is temporarily interrupted and the
indicator lights (white). During recording, allows automatic setting of
chapters. To resume recording from the recording pause mode, press the
REC button.
When pressed, recording begins to the selected recording destination
(drive or project), and the indicator lights (white).
Allows connection of a USB mouse and keyboard for control of the unit. (*2)
During normal playback, press for frame advance. Hold depressed for
slow motion playback; during slow mode, press again to increase
playback speed.
During normal playback, press for frame playback in reverse direction.
Hold depressed for slow motion playback; during slow mode, press to
decrease playback speed.
During playback, press to move to next title or chapter. Hold depressed to
initiate scan mode.
During playback, press to move to previous title or chapter. Hold
depressed to initiate scan mode.
Press to select function menu items and commands, and to input DVD
menu items and commands (during DVD playback).
During recording, press to insert chapter marks at optional locations.
Use when selecting function menu items, and for DVD menu control
(during DVD playback).
These are ventilation ports provided to prevent excessive heating of
internal parts. During installation and operation, do not allow these ports
to become blocked, since malfunctions may result.
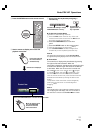
* Air filters are installed inside these filter covers, and must be removed
and replaced at regular intervals. Continuing to use the unit with clogged
filters may result in malfunction. Consult the appended instruction sheet
“Air Filter Replacement Instructions and Precautions”.
Press to enable and disable the monitor’s on-screen function menu
display (default setting: DISABLED). When disabled, the unit returns to
idling condition.
Press to turn on-screen display (OSD) ON/OFF (default setting: OFF). This
button does not operate when on-screen function display is set to
DISABLED.
Receives signals from the remote control unit. Do not allow this part to be
blocked by other objects.
Use to adjust output level to the headphones jack.
Use to connect headphones.
*1 • Connect to progressive-scan TV monitor. Non-progressive monitors will not produce correct playback.
• When progressive is set to ON, no video is output to any output connectors except the component output.
*2 Functionality is not guaranteed on all possible mouse/keyboards. If unstable operation is experienced, try reconnecting
the USB connector. If operation continues to be erratic, consult your Pioneer dealer or one of the service centers listed at
the end of this manual.
*3 This operates the same as the remote control unit’s SETUP button. The FUNCTION button operates only in the idling
condition.