


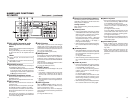
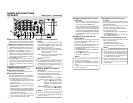

15
Ⅵ [INDEX–/;
] button
• During normal display, the function of this but-
ton can be selected using “;
,:” KEY FUNC
in the SYSTEM (1/2) Menu screen.
If it is set to VAR, the searching speed de-
creases if this button is pressed during a
search operation.
(
☞
Page 50 “Search mode”)
If it is set to INDEX, press this button to start
reverse index search. This function is not ef-
fective during recording or recording pause.
(
☞
Page 52 “Index search”)
• When the setting screen is displayed, this but-
ton is used to return to the previous menu or
select setting digits.
Ⅵ [SET/PRESET] button
• When the Menu screen, Date/Time setting
screen or the Multi Cue-up screen is dis-
played, press this button to confirm the set-
ting value.
• When the time code preset screen is dis-
played, press this button to preset the se-
lected time codes or user’s bit to the time code
generator.
*
Special functions/Setting buttons
The following buttons have different functions
depending on whether the normal screen or the
setting screen is displayed.
Setting screens:
Menu, Date/Time setting, Time code preset and
Multi Cue-up
Ⅵ [DISP/8] button
• During normal display, this button is used to
enable/disable the LCD or select display style.
When this button is pressed, the LCD dis-
play changes in the following manner.
Enlarged character display ¥ Enlarged
image/character display ¥ Image/character
display ¥ Image display ¥ No display ¥
Enlarged character display...
• When the setting screen is displayed, this but-
ton is used to select the items or setting val-
ues.
Ⅵ [BLANK/9] button
• When BR-DV6000 is in the stop mode, press
this button to start blank search. It searches
the unrecorded part of the tape and goes into
the still mode.
(
☞
Page 52 “Blank search”)
• When the setting screen is displayed, this but-
ton is used to select the items or setting val-
ues.
Ⅵ
[INDEX+/:] button
• During normal display, the function of this but-
ton can be selected using “;,:” KEY FUNC
in the SYSTEM (1/2) Menu screen.
If it is set to VAR, the searching speed in-
creases if this button is pressed during a
search operation.
(
☞
Page 50 “Search mode”)
If it is set to INDEX, press this button to start
forward index search. This function is not ef-
fective during recording or recording pause.
(
☞
Page 52 “Index search”)
• When the setting screen is displayed, this but-
ton is used to select items or setting digits.
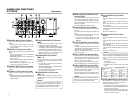
14
0
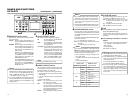
[REC LEVEL] Volume for audio
recording level for CH1/3 and
CH2/4
Use the switch to adjust the audio recording level
for CH1 and CH2.
During audio dubbing, the audio recording level
for CH3 and CH4 can be adjusted with this
switch.
!
[PHONES] terminal
This is the mini jack terminal for connecting to
the headphone. (Stereo ø3.5)
• When BR-DV6000 plays back tapes recorded
in the 32 kHz mode, the audio channel for
outputting from this terminal is selected with
the 6 AUDIO OUTPUT switch.
@
[PHONES] Headphone volume
Use this switch to adjust the output level of the
PHONES terminal.
Both channels are adjusted at the same time.
#
[MIC] terminal
This is the mini jack terminal for monaural mi-
crophone input.
To input sound from a microphone, set the [IN-
PUT SELECT] switch to LINE or Y/C (CPN).
If a microphone is connected, sound for the AU-
DIO IN terminal located on the rear panel can-
not be input.
The sound of the microphone is recorded to
CH1/CH2 in the recording mode and CH3/CH4
in the audio-dubbing mode.
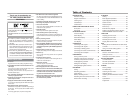
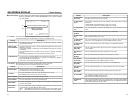
NAMES AND FUNCTIONS
OF PARTS
– Front panel – (continued)
Memo
●
During DV input, the volume control is not
effective.
●
During MIC input, only the volume for CH1/3
REC LEVEL is valid.
$
[HOLD] button
If this button is pressed in the LCD enlarged
display mode, the time code preset screen will
be displayed on the LCD. When the time code
preset screen is displayed, press this button to
return to the normal display.
(
☞
Page 59 “Presetting time code”)
%
[MENU] button
If this button is pressed when BR-DV6000 is in
the STOP/STILL mode or when no cassette is
loaded, the menu is displayed on the LCD or
the monitor connected to the VIDEO MONITOR
OUT terminal.
When the menu is displayed, press this button
to return to the normal display.
(
☞
Page 70 “Setting the menu”)
^
[RESET] button
• To reset the CTL counter display to “00”, press
this button.
• If this button is pressed when the time code
preset screen is displayed, all the digits of
the time code or the user’s bit are reset to
“00”.
• When the Multi Cue-up screen is displayed,
press this button to clear the registered cue-
up points.
&
[CUE UP] button
When the
8
COUNTER switch is set to TC,
press this button to display the Multi Cue-up
screen on the monitor or LCD.
When the Multi-Cue-up screen is displayed,
press this button to start searching the selected
tape position.
(
☞
Page 54 “Multi Cue-up”)
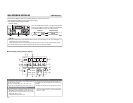
BR-DV6000
PROFESSIONAL
MENU RESET
A.DUB
EJECT
COUNTER
AUDIO INPUT
SELECT
MONITOR OUTPUT REMOTE
LOCAL
CTL L
MIX
R
CH-1/2
MIX
CH-3/4
DV
LINE
Y/C
(CPN)
TC
UB
REW STOP FF
REC
OPERATE
PLAY PAUSE
DISP
SET INDEX+
BLANK CUE UP
HOLD
PHONES REC LEVEL
CH-1/3 CH-2/4
MIC
INDEX–
Mini
$
#
!@ 0
%*^ &