


39
BR-DV6000
PROFESSIONAL
MENU RESET
A.DUB
EJECT
COUNTER
M
CTL
M
I
TC
UB
DISP
SET INDEX+
BLANK CUE UP
HOLD
PHONES REC LEVEL
CH-1/3 CH-2/4
MIC
INDEX–
Mini
–––DISPLAY[1/2]–––
LCD BRIGHTNESS 0
LCD CHROMA 0
LCD CONTRAST 0
LCD AUTO OFF OFF
DISPLAY ON
COUNTER POSI . LOWER-R
NEXT PAGE
PAGE BACK
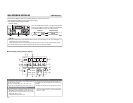
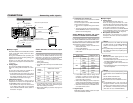
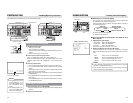
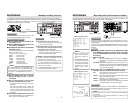
Ⅵ Selecting the LCD status display
The contents of the status display for the LCD are selected with
the DISP button located on the front panel.
When the DISP button is pressed, the status display changes in
the following sequence.
(
☞
Page 20 “On-screen display”)
(
☞
Page 26 “LCD display”)
Ⅵ The LCD settings are performed in the DISPLAY (1/2)
Menu display.
● Adjusting the LCD display
• Brightness : With LCD BRIGHTNESS
• Color depth : With LCD CHROMA.
• Contrast : With LCD CONTRAST.
Each of the above can be set up in 11 levels.
● Setting the display time of the LCD display
If the LCD display is not to be used for a long time, LCD AUTO
OFF can be selected to set the time for the LCD to go off automati-
cally.
OFF : Does not turn off automatically.
30MIN : Turns off automatically after 30 minutes.
1HOUR : Turns off automatically after 1 hour.
2HOUR : Turns off automatically after 2 hours.
Memo
● During recording or playback, the LCD display stays on regard-
less of the LCD AUTO OFF setting.
● After the LCD display was turned off automatically, press any
button to restore the original display.
DISPLAY (2/2) Menu screen
DISP button
LCD
PREPARATION
– Setting the LCD display –
No
display
Image
display
Image/
character display
Enlarged
character display
Image/enlarged
character display
38
BR-DV6000
PROFESSIONAL
MENU RESET
A.DUB
EJECT
COUNTER
AUDIO INPUT
SELECT
MONITOR OUTPUT REMOTE
LOCAL
CTL L
MIX
R
CH-1/2
MIX
CH-3/4
DV
LINE
Y/C
(CPN)
TC
UB
REW STOP FF
REC
OPERATE
PLAY PAUSE
DISP
SET INDEX+
BLANK CUE UP
HOLD
PHONES REC LEVEL
CH-1/3 CH-2/4
MIC
INDEX–
Mini
BR-DV6000
PROFESSIONAL
MENU RESET
A.DUB
EJECT
COUNTER
AUDIO INPUT
SELECT
MONITOR OUTPUT REMOTE
LOCAL
CTL L
MIX
R
CH-1/2
MIX
CH-3/4
DV
LINE
Y/C
(CPN)
TC
UB
REW STOP FF
REC
OPERATE
PLAY PAUSE
DISP
SET INDEX+
BLANK CUE UP
HOLD
PHONES REC LEVEL
CH-1/3 CH-2/4
MIC
INDEX–
Mini
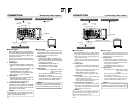
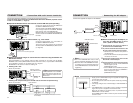
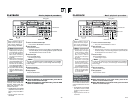
32K CH–1/2 0 min
SP 00
03/04/03 NO CASSETTE
11:20:00 TCR 02:00:00:00
REC
SAVE
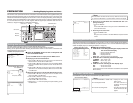
Loading the cassette tape
Use standard DV cassette tapes or mini DV cassette tapes.
VCR mode status display
1.
Check the cassette tape.
• Setting the rear switch.
Push it to “REC” for recording
To prevent its contents from being erased accidentally, push it to
“SAVE”.
• Ensure that the tape is not loosened.
2.
Ensure that no cassette tape is loaded.
With no cassette tape loaded, the cassette LED is off.
When no cassette tape is loaded, the status display for the VCR
operation mode shows “NO CASSETTE” on the monitor or the
LCD.
3.
Load the cassette tape.
• Insert a standard DV cassette tape into the tape-loading slot.
• For a mini DV cassette tape, load it in between the left and right
guides.
Set the tape window face up and push the cassette tape in slowly
until it is drawn in automatically.
➞When the cassette tape is loaded, the status display indicates
“STANDBY-ON”.
❈
If the STANDBY-ON mode is left as is, it goes into the STANDBY-
OFF mode.
In the STANDBY-OFF mode, press the STOP button to return to
the STANDBY-ON mode.
Memo
●
The cassette tape can be
loaded/ejected even
when BR-DV6000 is in
the OPERATE OFF
mode.
●
The loading/ejecting ac-
tion of the cassette tape
takes about 6 seconds.
Ejecting the cassette tape
1.
Press the EJECT button of BR-DV6000.
➞While the cassette tape is being ejected, the status display flashes
“EJECT”.
2.
Remove the cassette tape.
Eject button
Guide
Standard DV tape
Mini DV tape
Switch
PREPARATION
– Loading/Ejecting cassette –
Cassette LED