


46
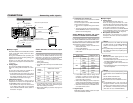
BR-DV6000
PROFESSIONAL
MENU RESET
A.DUB
EJECT
COUNTER
AUDIO INPUT
SELECT
MONITOR OUTPUT REMOTE
LOCAL
CTL L
MIX
R
CH-1/2
MIX
CH-3/4
DV
LINE
Y/C
(CPN)
TC
UB
REW STOP FF
REC
OPERATE
PLAY PAUSE
DISP
SET INDEX+
BLANK CUE UP
HOLD
PHONES REC LEVEL
CH-1/3 CH-2/4
MIC
INDEX–
Mini
VIDEO
LINE
IN
OUT
MONITOR
OUT
DC12V
DV
IN/OUT
IN OUT
OFF
AUDIO
REMOTE2
IN
B-YR-Y
SYNC IN
TIME CODE
IN OUT
Y
COMPONENT
OUT
CH 1/3 CH 2/4
IN
OUT
MONITOR
OUT
REMOTE1
TIMER
REC PLAY
SERIAL
REMOTE
SINGLE
GND
Y/C
SERIAL OUTSERIAL IN
———
REMOTE[1 /2]
———
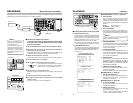
REMOTE SEL 9P ON
REMOTE SEL SER ON
REMOTE SEL DV ON
REMOTE SEL JVC ON
REMOTE SEL NET ON
LOCAL FUNCTION STP+EJT
PREROLL 7SEC
NEXT PAGE
PAGE BACK
———REMOTE[2/2]———
REM FF/REW MODE FF/REW
REM STOP SEL. EE
PB START DELAY OF
SYNCHRONIZAT ION ON
CONTROLLER SEL TYPE1
FOOT SW OFF
PAGE BACK
:Connection:
The serial remote controller (RM-G30, sold separately) can be con-
nected to the SERIAL REMOTE IN terminal located on the rear panel
of BR-DV6000.
The input signals of the SERIAL REMOTE IN terminal can be through-
output from the SERIAL REMOTE OUT terminal. (Only with OPER-
ATE ON)
:Setting:
Ⅵ To use the SERIAL IN terminal, set REMOTE SEL SER
in the REMOTE (1/2) Menu screen to ON or LOC+REM.
Then, set the REMOTE/LOCAL switch on the front panel
accordingly.
● REMOTE SEL SER
ON : When the REMOTE/LOCAL switch is set to REMOTE,
operations can be performed via the SERIAL REMOTE
IN terminal.
LOC+REM: With the REMOTE/LOCAL switch is set either way,
operations can be performed via the SERIAL REMOTE
IN terminal. With this setting, the buttons and switches
of the unit can be used too.
Ⅵ Set FOOT SW in the REMOTE (2/2) Menu screen ac-
cording to how the serial remote terminal is used.
OFF : Set to OFF when the serial remote controller is used.
The footswitch cannot be used.
L EDGE : Recording and recording pause is switched at the LOW
edge of the footswitch signal.
H EDGE : Recording and recording pause is switched at the
HIGH edge of the footswitch signal.
L LEVEL : Recording is performed at the LOW edge and paused
at the HIGH edge of the footswitch signal.
:Operation:
Before using the foot switch, set BR-DV6000 to the RECORDING or
RECORDING PAUSE mode using the relevant buttons of the unit.
(Only with L EDGE and H EDGE)
Memo
● The foot switch can only be used to switch between RECORDING
ON and OFF.
● The foot switch can be operated regardless of the setting of the
REMOTE/LOCAL switch.
Memo
●
Besides recording, the
serial remote controller
can perform other func-
tions.
● If the REMOTE SEL SER
is set to ON, unit buttons
that can be operated can
be selected from LOCAL
FUNCTION in the RE-
MOTE (1/2) Menu
screen.
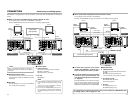
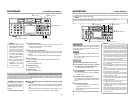
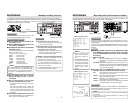
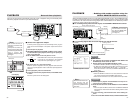
Recording can be turned ON/OFF with a serial remote controller or foot switch connected to the
SERIAL REMOTE IN terminal located at the rear panel of BR-DV6000.
REMOTE/LOCAL switch
• Serial remote controller: RM-G30
• Foot switch
REMOTE (1/2) Menu screen
REMOTE (2/2) Menu screen
RECORDING
– Recording with serial remote terminals –
Foot switch
Serial IN
H
400ms
L
Min
Signal
terminal
45
BR-DV6000
PROFESSIONAL
MENU RESET
A.DUB
EJECT
COUNTER
AUDIO INPUT
SELECT
MONITOR OUTPUT REMOTE
LOCAL
CTL L
MIX
R
CH-1/2
MIX
CH-3/4
DV
LINE
Y/C
(CPN)
TC
UB
REW STOP FF
REC
OPERATE
PLAY PAUSE
DISP
SET INDEX+
BLANK CUE UP
HOLD
PHONES REC LEVEL
CH-1/3 CH-2/4
MIC
INDEX–
Mini
LIGHT
ON
OFF
COUNTER
CTL
TC
UB
RESET
OPERATE/WARNING
MONITOR
SELECT
STATUSSHUTTER
MENU
FILTER
1 3200k
2 5600k
3 5600k+ND
POWER
NG
GAIN
OU
T
PU
T
W
H
T
.BA
L
VT
R
ON OFF
ALARM
MONITOR
S
A
V
E
S
T
B
Y
H
M
L
B
A
R
S
C
A
M
A
U
T
O
K
N
E
E
P
R
S
T
A
B
O
N
O
F
F
CH-1
CH-2
AUDIO
LEVEL
AUTO IRIS LOLUX
BACK L
NORMAL
SPOT L
STRETCH
NORMAL
COMPRESS
FULL AUTO BLACK
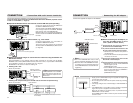
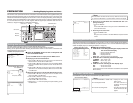
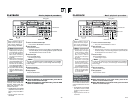
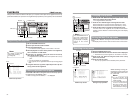
In combination with DV equipment, BR-DV6000 can perform continuous, long-hour recording.
BR-DV6000 can be set as the backup unit connected to a DV camcorder (GY-DV300/DV500/DV550/
DV5000, etc.). When the recording tape of the source unit nears its end, BR-DV6000 can start
recording, enabling long-hour recording.
:Connection:
Connect the DV terminal of the source unit to the
DV terminal of BR-DV6000 with a DV cable.
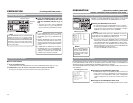
:Setting up BR-DV6000:
Ⅵ
Set the [INPUT SELECT] switch on the
front panel to “DV”.
Ⅵ Set the [REMOTE/LOCAL] switch on the
front panel to “REMOTE”.
Ⅵ Set BACKUP REC TIME in the SYSTEM
(1/2) Menu screen.
Use the following settings according to the tape
length of the source unit.
* For DV or mini DV cassette tape:
25MIN : 30-minute tape
55MIN : 60-minute tape
75MIN : 80-minute tape
115MIN : 120-minute tape
175MIN : 180-minute tape
265MIN : 270-minute tape
OFF : No backup recording
:Operation:
1.
Recording begins on the source unit.
❈
Ensure that recording starts from the begin-
ning of the recording tape.
2.
BR-DV6000 begins recording when the tape
of the source unit nears its end (about 5 min-
utes before the end of the tape).
• BR-DV6000 begins recording when the re-
cording time of the source unit reaches the
time set by BACKUP REC TIME.
DV terminal
DV cable
DV terminal
Backup unit: BR-DV6000
INPUT SELECT switch
RECORDING
– Backup recording function –
Memo
• In backup recording, BR-DV6000 records
video/sound from the source unit.
While this unit is performing backup record-
ing, continue shooting from the source unit.
• The audio mode is the one selected in the
source unit. (32 K/48 K)
• Set BACKUP REC TIME to “OFF” if the unit
is not performing backup recording.
Ⅵ
Set the REMOTE SEL DV in the RE-
MOTE (1/2) Menu screen to ON or
LOC+REM.
Ⅵ Set TC DUPLICATE in the TC/UB/
CLOCK (1/2) Menu screen to OFF.
• It records the data of the built-in time code
generator.
• When TC DUPLICATE is set to AUTO, the
time code of the DV camcorder will stop ad-
vancing. If the DV cable is disconnected, the
time code of the backup recording will stop
advancing.
Ⅵ For using GY-DV5000 as the source unit
Set DV REC TRIGGER in the OTHERS (1/2)
Menu screen of GY-DV5000 to OFF.
Memo
With REPLICATION in the SYSTEM (2/2)
menu screen set to “DV”, BACKUP REC TIME
is fixed to “OFF”. For using the backup record-
ing function, set REPLICATION to “OFF” or
“SERIAL”.
REMOTE/LOCAL switch