


101
OTHERS
– Optional devices –
VIDEO
LINE
IN
OUT
MONITOR
OUT
DC12V
DV
IN/OUT
IN OUT
OFF
AUDIO
REMOTE2
IN
B-YR-Y
SYNC IN
TIME CODE
IN OUT
Y
COMPONENT
OUT
CH 1/3 CH 2/4
IN
OUT
MONITOR
OUT
REMOTE1
TIMER
REC PLAY
SERIAL
REMOTE
SINGLE
GND
Y/C
A
B
C
C
Memo
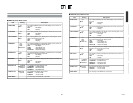
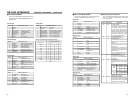
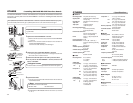
Install an optional board, SA-DV6000, SA-
X61U, or SA-X62U to
B
as shown in the dia-
gram above.
Note
Contact your JVC authorized service agent before installing the above optional boards.
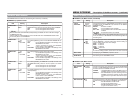
Ⅵ XLR IN board: SA-X61U
This is an audio input board with two XLR ter-
minals.
• Connect it to
B
.
• To enable audio input from the terminals, set
AUDIO INPUT SEL in the AUDIO Menu
screen to XLR. (
☞
Page 78)
Ⅵ XLR OUT board: SA-X62U
This is an audio output board with two XLR ter-
minals.
• Connect it to
B
.
Ⅵ SR-232C interface board: SA-K46U
This is an interface board for controlling BR-
DV6000 with the RS-232C interface. Connect it
to BR-DV6000 with the RS-232C cable. Use a
reverse-type cable.
• Replace it with the RS-422A REMOTE (9-
PIN) terminal of
A
. (
☞
Page 102)
• To control BR-DV6000 with RS-232C, set
REMOTE SEL 232 in the REMOTE (1/2).
Menu screen to “ON”.
• Details of the command: (
☞
Page 84)
Ⅵ Network board: SA-DV6000
This network board can be used to record
streaming data of video and sound of BR-
DV6000 on to CF card, and to transmit stream-
ing data to the PC via a LAN card.
• Connect it to
B
.
• To control BR-DV6000 with SA-DV6000, set
REMOTE SEL NET in the REMOTE (1/2).
Menu screen to ON or LOC+REM.
• With the SA-DV6000 installed, the network-
related menus will be added.
For details, refer to the user’s guide of SA-
DV6000.
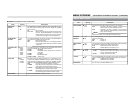
Installing SA-X61U or SA-X62U
1. Remove the slot cover by removing the two
C
screws, which are securing the cover.
2. Insert SA-X61U or SA-X62U into BR-DV6000.
3. Fix SA-X61U or SA-X62U to BR-DV6000 with
the two
C
screws, removed in 1.
100
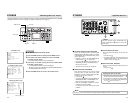
OTHERS
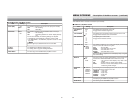
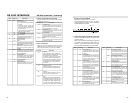
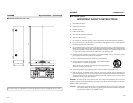
– Checking the hour meter –
This unit displays the drum usage time as the hour meter in DRUM HOUR METER in the SYSTEM
(2/2) Menu screen. Use it as a guide for regular maintenance. (
☞
Page 7)
SET button
MENU button
8 button
9 button
: button
TOP MENU screen
SYSTEM (1/2) Menu screen
SYSTEM (2/2) Menu screen
BR-DV6000
PROFESSIONAL
MENU RESET
A.DUB
EJECT
COUNTER
AUDIO INPUT
SELECT
MONITOR OUTPUT REMOTE
LOCAL
CTL L
MIX
R
CH-1/2
MIX
CH-3/4
DV
LINE
Y/C
(CPN)
TC
UB
REW STOP FF
REC
OPERATE
PLAY PAUSE
DISP
SET INDEX+
BLANK CUE UP
HOLD
PHONES REC LEVEL
CH-1/3 CH-2/4
MIC
INDEX–
Mini
TIXE
..PILCEIVOM
..GIFNOCKCAPKROWTEN
..TESYALPSID
..KCOLC/BU/CT
..OEDIV
..OIDUA
..ETOMER
..METSYS
–––UNEM–––
KCABEGAP
EGAPTXEN
FFOEDOMTAEPER
XEDNI.CNUFYEK”,“
VDA.FEDOMESUAPGNOL
NIM5EMITESUAPGNOL
FFOEMITCERPUKCAB
DN2EDOMVDA.F/LTS
OTUATCELESCNYS
––––––]2/1[METSYS–––
–––SYSTEM[2/2]––––––
DC IN MODE OPE OFF
INDEX WRITE ON
REPLICATION OFF
REPLICATE DELAY OFF
OPERATION LOCK OFF
KCABEGAP
002000RETEMRUOHMURD
LECNACGNITTESYROTCA
CSTNNIVD/BP
F
Drum usage time
:Operation:
Ⅵ Set BR-DV6000 to the STOP mode:
1.
Press the MENU button to display the TOP MENU screen.
2.
Press the 8 or 9 button to bring the cursor to SYSTEM.
Press SET or the : button.
¥ The SYSTEM (1/2) Menu screen is displayed.
3.
Press the 8 or 9 button to bring the cursor to NEXT PAGE.
Press SET or the : button.
¥ The SYSTEM (2/2) Menu screen is displayed.
• The drum usage time is displayed on DRUM HOUR METER in
the SYSTEM (2/2) Menu screen.
4.
Press the MENU button to return to the normal screen.