


36
Turning on the power
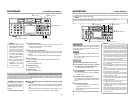
BR-DV6000
PROFESSIONAL
RESET
A.DUB
EJECT
COUNTER
AUDIO INPUT
SELECT
MONITOR OUTPUT REMOTE
LOCAL
CTL L
MIX
R
CH-1/2
MIX
CH-3/4
DV
LINE
Y/C
(CPN)
TC
UB
REW STOP FF
REC
OPERATE
PLAY PAUSE
DISP
SET INDEX+
BLANK CUE UP
REC LEVEL
CH-1/3 CH-2/4
PREPARATION
– Turning on/off the power –
Note
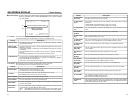
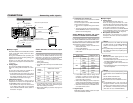
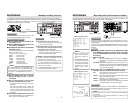
After the OPERATE button is pressed and BR-
DV6000 is turned on, if the green indicator
blinks or the monitor or the LCD displays “UN-
PLUG MAIN POWER, PLUG BACK IN AFTER
A WHILE”, unplug the power cord from the
power outlet, leave it for a while before turning
on the power again.
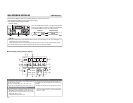
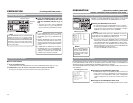
Ⅵ Press the OPERATE button when BR-
DV6000 is in the OPERATE OFF mode
(with the OPERATE indicator lit up in
red)
• The power is turned on and the OPERATE
indicator lights up in green. BR-DV6000 is
ready for operation. (OPERATE ON mode)
Ⅵ Turn off BR-DV6000
1.
Press the OPERATE button.
• BR-DV6000 enters the OPERATE OFF mode and the OPERATE indicator lights up in red.
2.
If BR-DV6000 is not to be used for a long period of time, unplug the AC adapter.
To unplug the AC adapter, remove the power cord from the power outlet first.
Memo
●
In the OPERATE OFF mode, if a cassette
tape is inserted, the power is turned on and
BR-DV6000 goes into the OPERATE ON
mode.
● Whether BR-DV6000 goes into the OPER-
ATE ON or OFF mode when the power is sup-
plied to the DC IN terminal can be selected
with DC IN MODE in the SYSTEM (2/2) Menu
screen.
● If TIMER REC or TIMER PLAY is selected,
BR-DV6000 starts up in the OPERATE ON
mode regardless of the DC IN MODE Menu
settings. If a cassette tape is loaded, BR-
DV6000 starts recording or playback.
Turning off the power
OPERATE indicator
OPERATE
button
37
BR-DV6000
PROFESSIONAL
A.DUB
EJECT
COUNTER
AUDIO INPUT
SELECT
MONITOR OUTPUT REMOTE
LOCAL
CTL L
MIX
R
CH-1/2
MIX
CH-3/4
DV
LINE
Y/C
(CPN)
TC
UB
REW STOP FF
REC
OPERATE
PLAY PAUSE
———
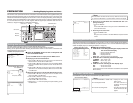
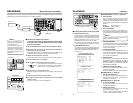
REMOTE[1 /2]
———
REMOTE SEL 9P ON
REMOTE SEL SER ON
REMOTE SEL DV ON
REMOTE SEL JVC ON
REMOTE SEL NET ON
LOCAL FUNCTION STP+EJT
PREROLL 7SEC
NEXT PAGE
PAGE BACK
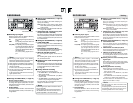
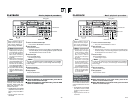
–––SYSTEM[2/2]––––––
DC IN MODE OPE OFF
INDEX WRITE INDEX
REPLICATION OFF
REPLICATE DELAY OFF
OPERATION LOCK ON
F
PB/DV IN NTSC
ACTORY SETTING CANCEL
DRUM HOUR METER 000000
PAGE BACK
PREPARATION
– Operation method (main unit/
remote controller) and operation lock mode –
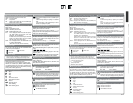
Selecting the operating method (main unit/remote controller)
OPERATION LOCK mode
REMOTE (1/2) Menu screen
Memo
With the REMOTE/LOCAL switch set to REMOTE, the JVC bus
or RS-422A can be enabled using REMOTE SEL JVC or RE-
MOTE SEL 9P in the REMOTE (1/2) Menu screen.
Memo
If the REMOTE/LOCAL
switch is set to REMOTE,
the buttons that can be op-
erated by the main unit can
be selected with LOCAL
FUNCTION.
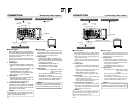
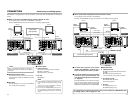
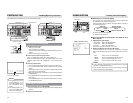
Ⅵ
Setting the REMOTE/LOCAL switch
• To operate with the buttons of BR-DV6000, set it to “LOCAL”.
• To operate BR-DV6000 with RS-422A or JVC-bus editing re-
mote controller that is connected to the REMOTE 1 (9-PIN) or
REMOTE 2 (12-PIN) terminal, set it to “REMOTE”.
• The setting position of the REMOTE switch for operating BR-
DV6000 with the SERIAL REMOTE terminal can be selected
using REMOTE SEL SER in the REMOTE (1/2) Menu screen.
• The setting position of the REMOTE switch for operating BR-
DV6000 with the DV terminal can be selected at REMOTE SEL
DV in the REMOTE (1/2) Menu screen.
(
☞
Page 75 “REMOTE (1/2) Menu screen”)
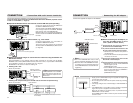
BR-DV6000 comes with an operation lock function to prevent unauthorized or incorrect operation.
In the OPERATION LOCK mode, the operation buttons and slide switches of BR-DV6000 are
disabled. However, the OPERATE ON and MENU operations are effective.
The AUDIO MONITOR switch, TIMER switch, PHONES volume and REC LEVEL volume are al-
ways effective.
Whether to operate BR-DV6000 with its buttons or the remote
controller can be selected with the REMOTE/LOCAL switch.
Ⅵ
Turning on the OPERATION LOCK mode
Set OPERATION LOCK in the SYSTEM (2/2) Menu screen to ON.
• If the operation button of BR-DV6000 is pressed while BR-
DV6000 is in the OPERATION LOCK mode, “OPERATION
LOCK” is displayed on the monitor or the LCD for about 3 sec-
onds.
Ⅵ
Turning off the OPERATION LOCK mode
Set OPERATION LOCK in the SYSTEM (2/2) Menu screen to OFF.
SYSTEM (2/2) Menu screen