


4
Thank you for purchasing our
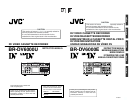
DV Video Cassette Recorder
BR-DV6000.
● DV format
High picture and sound quality by digital technology.
● Compatible mechanisms for standard/mini DV cas-
sette tapes
It records on and plays back DV cassette tapes of the
standard and mini size. (SP mode only)
Recording in the DV format can be performed on
DVCAM cassette tapes.
● Only PAL/NTSC DVCAM tapes are detected auto-
matically in playback mode.
● Equipped with composite, component and Y/C in-
put & output terminals.
● Equipped with DV IN/OUT terminals. (IEEE1394)
It can exchange digital signals with IEEE1394-compat-
ible devices.
● Both NTSC and PAL signals supported
BR-DV6000 can playback or record PAL tapes through
the DV input. For PAL, please set the PB/DV IN menu
item to PAL.
For analog signal input, only NTSC is supported.
● RS-422A and JVC bus interface supported
RS-422A-compatible edit controller RM-G820 and JVC
bus-compatible edit controller RM-G800/G805 can be
used for editing.
● Optionally, the RS-232C interface can be used.
● Recording and playback of time codes
● Time code I/O terminal
Slave lock is allowed if BR-DV6000 is connected to an
external time code generator.
● SYNC IN terminal
External synchronization signals can be input.
● Audio-dubbing function (after-recording)
If the sampling frequency is 32 kHz, audio dubbing can
be performed into CH3 and CH4 (except during DV in-
put).
● Backup recording function
With the combined use of other DV machines, long-time
continuous recording is possible.
●
Using the SERIAL REMOTE OUT terminal or DV ter-
minal, dubbing with other recorders is possible only
with playback operation by BR-DV6000. (Replication
function)
● Equipped with a 2.5-inch color LCD
Images, status display and menu display can be viewed.
● Multi-cue up
Up to 5 points of the tape position can be registered
and cued up.
● Index/blank search function
It can search for positions where index signals are re-
corded and unrecorded parts.
● Repeat play function
There are 3 types of repeat function.
(INDEX/ VIDEO END/ TAPE END)
● Recording/playback with an external timer
● With the use of the network board SA-DV6000 (sold
separately), image and audio streaming data can be
recorded on a CF card, and with a LAN card, stream-
ing data can be transmitted to a PC.
● With the XLR IN board SA-X61U or XLR OUT board
SA-X62U (sold separately), audio input/output via
the XLR terminal is possible.
As this is a DV-format video cassette recorder,
video cassettes with the
or
logo can
be used with it.
DVCAM cassettes can be recorded in the DV
format.
● In order to prevent crumpling due to tape
slack, do not perform important recording
within the first and last 2 – 3 minute-run of
the tape.
● Recorded video (sound) is meant for per-
sonal entertainment only and must not be
used for other purposes without the prior
consent of the copyright owner.
● JVC shall not guarantee the quality of re-
cording and playback should BR-DV6000 fail
to function normally due to defects, either
of the unit itself or the video cassette tapes.
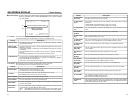
MAIN FEATURES
5
INTRODUCTION
Remarks of usage ......................................... 6
Regular maintenance .................................... 7
Cleaning tape ................................................ 8
Cassette tape ................................................ 8
Condensation ................................................ 9
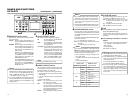
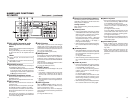
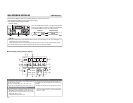
NAMES AND FUNCTIONS OF PARTS
Front panel .................................................. 10
Rear panel................................................... 16
ON-SCREEN DISPLAY
On-screen display .......................................20
Status display ..............................................21
Status/Event display ....................................23
Alarm display............................................... 24
LCD display .................................................26
CONNECTION
Connecting video signals ............................28
Connecting audio signals ............................ 30
Connecting to editing system ...................... 32
Connecting with serial remote terminals .....34
Connecting the AC adapter .........................35
PREPARATION
Turning on/off the power.............................. 36
Operation method (main unit/remote
controller) and operation lock mode ............37
Loading/Ejecting cassette ...........................38
Setting the LCD display............................... 39
Setting/Displaying date and time................. 40
RECORDING
Setting ......................................................... 42
Recording procedure................................... 43
Audio dubbing ............................................. 44
Backup recording function........................... 45
Recording with serial remote terminals .......46
External timer recording .............................. 47
PLAYBACK
Setting ......................................................... 48
Basic playback procedure ........................... 49
Special playback functions ..........................50
Search function ...........................................52
Repeat playback..........................................53
Multi cue-up................................................. 54
External timer playback ...............................56
Dubbing with another machine using the
SERIAL REMOTE OUT/DV terminals ......... 57
TIME CODE
Displaying the time code ............................. 58
Presetting the time code ............................. 59
Recording the time code .............................60
Playing back the time code .........................63
EDIT
Editing with an RS-422A/JVC bus edit remote
controller ..................................................... 64
Using a non-linear editing system ............... 68
MENU SCREENS
Structure of the Menu screens .................... 69
Setting the menus .......................................70
Description of the Menu screens................. 72
RS-232C INTERFACE
Command tables ......................................... 84
RS-232C specifications ...............................85
RS-232C commands ...................................86
OTHERS
Warning display ...........................................97
Troubleshooting ...........................................99
Checking the hour meter ...........................100
Optional devices........................................ 101
Installing SA-K46U RS-232C interface
board ......................................................... 102
Specifications ............................................ 103
Supplement ............................................... 105
Table of Contents