


43
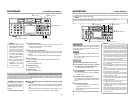
BR-DV6000
PROFESSIONAL
MENU RESET
A.DUB
EJECT
COUNTER
AUDIO INPUT
SELECT
MONITOR OUTPUT REMOTE
LOCAL
CTL L
MIX
R
CH-1/2
MIX
CH-3/4
DV
LINE
Y/C
(CPN)
TC
UB
REW STOP FF
REC
OPERATE
PLAY PAUSE
DISP
SET INDEX+
BLANK CUE UP
HOLD
PHONES REC LEVEL
CH-1/3 CH-2/4
MIC
INDEX–
Mini
Memo
If recording is performed
right after the RECORD-
ING PAUSE mode is exited,
index signals are not re-
corded.
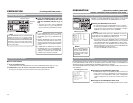
Memo
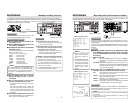
● The tape protection func-
tion enables BR-DV6000
automatically to go into
the STOP mode when
there is a long recording
pause. The time to go into
the STOP mode can be
set with LONG PAUSE
TIME in the SYSTEM (1/
2) Menu screen.
● When a home-use DV
VCR is used to play tapes
recorded with BR-
DV6000, the sound level
may be reduced.
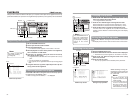
Recording index signals
Ⅵ
Press the REC button to record index signals during
recording.
❈
It is not possible to record only index signals after the recording.
Allow at least an interval of 1 minute between recordings of in-
dex.
❈
Index signals cannot be recorded with the REC button of the
remote controller. Use the record button of BR-DV6000.
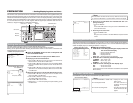
If INDEX WRITE is set to ON in the SYSTEM (2/2) Menu screen, an index signal is recorded at the
recording starting position of the tape. In the PLAYBACK mode, the position where the index signal
is recorded can be searched. (Index search)
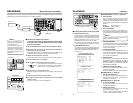
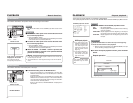
1.
Load the cassette tape.
• Before loading the cassette tape, please ensure that the rear
slide of the cassette tape is pushed to REC.
¥ The unit is turned on.
2.
Adjust the audio recording level.
• Adjust the REC LEVEL volume. Adjust it such a way that, with
the maximum volume, the audio level meter does not display
OVER.
❈
During DV input, the REC LEVEL volume cannot be adjusted.
3.
Start recording.
• Press the PLAY button while holding down the REC button.
4.
Pause recording.
• Press the PAUSE button.
5.
Resume recording.
• Press the PLAY button.
6.
Stop recording.
• Press the STOP button.
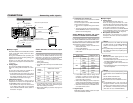
3.
REC button
3. 5
PLAY button
4.
PAUSE button
2.
REC LEVEL volume
6.
STOP button
RECORDING
– Recording procedure –
44
BR-DV6000
PROFESSIONAL
MENU RESET
A.DUB
EJECT
COUNTER
AUDIO INPUT
SELECT
MONITOR OUTPUT REMOTE
LOCAL
CTL L
MIX
R
CH-1/2
MIX
CH-3/4
DV
LINE
Y/C
(CPN)
TC
UB
REW STOP FF
REC
OPERATE
PLAY PAUSE
DISP
SET INDEX+
BLANK CUE UP
HOLD
PHONES REC LEVEL
CH-1/3 CH-2/4
MIC
INDEX–
Mini
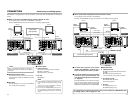
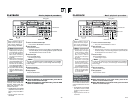
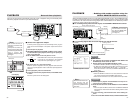
3. 1. 5.
6.4.
2. 3.
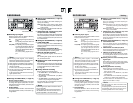
:Connection:
Audio dubbing sounds are input from the AUDIO
IN terminal on the rear panel or the MIC terminal
on the front panel. MIC terminal prevails over the
AUDIO IN terminal.
:Setting:
• Set AUDIO MODE in the AUDIO Menu screen
to “32 K.”
• Do not set the INPUT SELECT switch on the
front panel to “DV.”
:Operation:
1.
Press the PLAY button to play the tape.
2.
At the position where you wish to perform
audio dubbing, press the PAUSE button.
¥ The unit enters the STILL mode.
3.
Press the PAUSE button while holding down
the A.DUB button.
¥ The unit enters the AUDIO DUBBING
PAUSE mode.
4.
Adjust the audio recording level.
Recording level of the sound to be audio-dubbed
can be adjusted with the REC LEVEL Volume
knobs.
5.
Press the PLAY button.
¥ Audio dubbing begins. Audio signals are re-
corded on CH3 and CH4.
• To stop audio dubbing temporarily, press the
PAUSE button.
6.
To end audio dubbing, press the STOP button.
Memo
• During audio dubbing, if the tape comes to a
part recorded in a mode in which audio dubbing
cannot be performed (such as LP mode or 48
kHz audio mode), the VCR will enter the STOP
mode. When this happens, loud noise from the
DV output may come out. Hence, before audio-
dubbing, check the recording mode of the tape.
• In the case that a microphone is connected to
the MIC terminal, MIC sound from this terminal
will be recorded. In the absence of MIC input,
signals from the CH1/3, CH2/4 AUDIO IN termi-
nal on the rear panel will be recorded.
• When audio dubbing cannot be performed, an
alarm message will be displayed on the moni-
tor. (
☞
Page 25)
• Audio dubbing pause cannot be carried out di-
rectly in the STOP mode. Do so in the STILL
mode.
During audio dubbing pause, sound from CH3/
CH4 can be monitored, but sound output from
the DV terminal is not possible.
• If audio dubbing is repeated on a short section
of the tape, momentary noise may be produced
when the section is played.
• During audio dubbing, noise may be produced
on the playback video or EE sound, but the re-
cording is not affected.
• The playback sound of CH1/2 cannot be re-
corded on CH3/4 (sound-on-sound).
• If unrecorded parts are found during backspace
operation of audio dubbing, audio dubbing can-
not be performed.
• When audio dubbing is performed on tapes re-
corded on other devices, it may not record cor-
rectly. Record with BR-DV6000 before perform-
ing audio dubbing.
For tapes recorded in the 32 kHz audio mode, audio dubbing can be performed on CH3 and CH4
after the recording. (After-recording)
Notes
● For tapes recorded in the 48 kHz audio mode, audio dubbing cannot be performed.
● Audio dubbing cannot be performed for DV input signals.
A.DUB button
REC LEVEL Volume knobs
STOP button
PAUSE button
PLAY button
RECORDING
– Audio dubbing –