


E-42
BR-DV6000
PROFESSIONAL
MENU RESET
A.DUB
EJECT
COUNTER
AUDIO INPUT
SELECT
MONITOR OUTPUT REMOTE
LOCAL
CTL L
MIX
R
CH-1/2
MIX
CH-3/4
DV
LINE
Y/C
(CPN)
TC
UB
REW STOP FF
REC
OPERATE
PLAY PAUSE
DISP
SET INDEX+
BLANK CUE UP
HOLD
PHONES REC LEVEL
CH-1/3 CH-2/4
MIC
INDEX–
Mini
Ⅵ
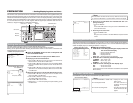
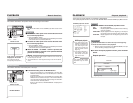
Settings of the AUDIO menu (
☞
Page 78)
● AUDIO MODE
This is for selecting the audio sampling fre-
quency for recording.
32 K: Recording in the 32 kHz mode. Select
32 K when performing audio dubbing on
CH3 and CH4.
48 K: Recording in the 48 kHz mode. Audio dub-
bing is not available.
● AUDIO INPUT SEL (Displayed only when
an optional board is installed)
This setting is required with XLR IN board SA-
X61U (sold separately) installed. Set this item
to XLR for selecting the audio input terminal of
the XLR IN board.
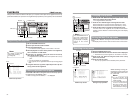
Ⅵ Setting the SYSTEM Menu (
☞
Page 73)
● LONG PAUSE TIME
This is for setting the time for BR-DV6000 to
enter the tape protection mode if there is a long
recording pause.
● INDEX WRITE: SYSTEM (2/2) Menu
This is for selecting whether to record index sig-
nals automatically when recording starts.
● PB/DV IN: SYSTEM (2/2) Menu
For recording PAL signals, set this item to PAL.
For recording NTSC signals from the DV termi-
nal, set this item to NTSC.
Ⅵ Setting the time code recording for DV
signal input
Select data from the built-in time code genera-
tor or from the DV terminal with TC DUPLICATE
in the TC/UB/CLOCK (1/2) Menu screen.
(
☞ Page 80)
Ⅵ Setting date/time recording
Perform setting for the following items.
• Set DATE REC in the TC/UB/CLOCK (2/2)
Menu screen to ON.
• Set DISPLAY in the DISPLAY (1/2) Menu
screen to ON.
• Set TIME/DATE in the DISPLAY (2/2) Menu
screen to any setting item except OFF.
The same data as on the date/time on-screen
display are recorded on a tape.
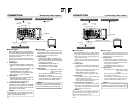
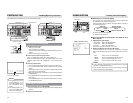
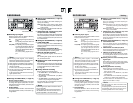
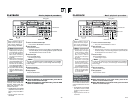
INPUT SELECT switch
Ⅵ Selecting input signal
Select the signal with the INPUT SELECT switch
located on the front panel.
DV : For inputting DV signals (video and
audio)
LINE : For inputting composite video and
analog sound signals
Y/C (CPN) : For inputting Y/C separate signals
or component signals for video. The
type of signal to input can be se-
lected with VIDEO INPUT SEL of
the VIDEO Menu.
For sound, analog signals are in-
put.
Memo
● For analog audio signals, if the AUDIO
INterminal and MIC terminal are used at the
same time, the MIC terminal precedes.
● Audio signals are recorded on CH1 and CH2.
● Analog signals cannot be recorded when PB/
DV IN is set to NTSC.
In such a case, recording is not possible.
● For DV signal input, the AUDIO MODE set-
ting cannot be performed.
It will be the same mode as that of the input
signal (48 K or 32 K).
Memo
With DV signal input, data of the built-in clock
are not recorded.
If video signals are input from the DV terminal,
the date/time data from this terminal are re-
corded regardless of the menu settings.
RECORDING
– Setting –
Ⅵ Settings the VIDEO Menu (
☞
Page 79)
● SET UP (only for NTSC)
Set here according to the existence of the setup
of analog video signals (composite, YC sepa-
rate and component). If it exists, set here to ON.
If it does not, OFF.
● BLACK BURST
Set BLACK BURST to ON to record the black
burst signals (black screen) of the built-in sig-
nal generator.
42
BR-DV6000
PROFESSIONAL
MENU RESET
A.DUB
EJECT
COUNTER
AUDIO INPUT
SELECT
MONITOR OUTPUT REMOTE
LOCAL
CTL L
MIX
R
CH-1/2
MIX
CH-3/4
DV
LINE
Y/C
(CPN)
TC
UB
REW STOP FF
REC
OPERATE
PLAY PAUSE
DISP
SET INDEX+
BLANK CUE UP
HOLD
PHONES REC LEVEL
CH-1/3 CH-2/4
MIC
INDEX–
Mini
Ⅵ
Settings of the AUDIO menu (
☞
Page 78)
● AUDIO MODE
This is for selecting the audio sampling fre-
quency for recording.
32 K: Recording in the 32 kHz mode. Select
32 K when performing audio dubbing on
CH3 and CH4.
48 K: Recording in the 48 kHz mode. Audio dub-
bing is not available.
● AUDIO INPUT SEL (Displayed only when
an optional board is installed)
This setting is required with XLR IN board SA-
X61U (sold separately) installed. Set this item
to XLR for selecting the audio input terminal of
the XLR IN board.
Ⅵ Setting the SYSTEM Menu (
☞
Page 73)
● LONG PAUSE TIME
This is for setting the time for BR-DV6000 to
enter the tape protection mode if there is a long
recording pause.
● INDEX WRITE: SYSTEM (2/2) Menu
This is for selecting whether to record index sig-
nals automatically when recording starts.
● PB/DV IN: SYSTEM (2/2) Menu
For recording NTSC signals, set this item to
NTSC.
For recording PAL signals from the DV termi-
nal, set this item to PAL.
Ⅵ Setting the time code recording for DV
signal input
Select data from the built-in time code genera-
tor or from the DV terminal with TC DUPLICATE
in the TC/UB/CLOCK (1/2) Menu screen.
(
☞ Page 80)
Ⅵ Setting date/time recording
Perform setting for the following items.
• Set DATE REC in the TC/UB/CLOCK (2/2)
Menu screen to ON.
• Set DISPLAY in the DISPLAY (1/2) Menu
screen to ON.
• Set TIME/DATE in the DISPLAY (2/2) Menu
screen to any setting item except OFF.
The same data as on the date/time on-screen
display are recorded on a tape.
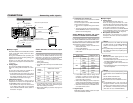
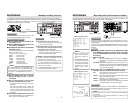
INPUT SELECT switch
Ⅵ Selecting input signal
Select the signal with the [INPUT SELECT]
switch located on the front panel.
DV : For inputting DV signals (video and
audio)
LINE : For inputting composite video and
analog sound signals
Y/C (CPN) : For inputting Y/C separate signals
or component signals for video. The
type of signal to input can be se-
lected with VIDEO INPUT SEL of
the VIDEO Menu.
For sound, analog signals are in-
put.
Memo
● For analog audio signals, if the AUDIO
INterminal and MIC terminal are used at the
same time, the MIC terminal precedes.
● Audio signals are recorded on CH1 and CH2.
● Analog signals cannot be recorded when PB/
DV IN is set to PAL.
In such a case, recording is not possible.
● For DV signal input, the AUDIO MODE set-
ting cannot be performed.
It will be the same mode as that of the input
signal (48 K or 32 K).
Memo
With DV signal input, data of the built-in clock
are not recorded.
If video signals are input from the DV terminal,
the date/time data from this terminal are re-
corded regardless of the menu settings.
RECORDING
– Setting –
Ⅵ Settings the VIDEO Menu (
☞
Page 79)
● SET UP (only for NTSC)
Set here according to the existence of the setup
of analog video signals (composite, YC sepa-
rate and component). If it exists, set here to ON.
If it does not, OFF.
● BLACK BURST
Set BLACK BURST to ON to record the black
burst signals (black screen) of the built-in sig-
nal generator.
E
U