


62
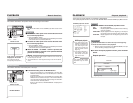
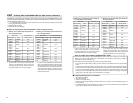
TC/UB/CLOCK(1/2) Menu screen
CH1/3
NDF
12
H
34
M
34
S
10
F
EXT
CH2/4
STOP
SP222
min
01/02/03
01:23:45 INS
AM
OVER
48k
T
C
L
dB010203040
OVER
W
Y/C
VA
SYNC
r
e
CF
STOP
KCABEGAP
EGAPTXEN
FFOTESFFOCT
FFOETACILPUDCT
–––)LAP(TIBFD
PORD)CSTN(FD/FDN
NUR-CEREDOMGCT
TESERPTCELESGCT
LANRETXEECRUOSGCT
––)–2/1(KCOLC/BU/CT–––
VIDEO
LINE
IN
OUT
MONITOR
OUT
DC12V
DV
IN/OUT
IN OUT
OFF
AUDIO
REMOTE2
IN
B-YR-Y
SYNC IN
TIME CODE
IN OUT
Y
COMPONENT
OUT
CH 1/3 CH 2/4
IN
OUT
MONITOR
OUT
REMOTE1
TIMER
REC PLAY
SERIAL
REMOTE
SINGLE
GND
Y/C
TIME CODE
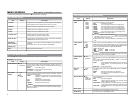
– Recording the time code – (continued)
Record time codes from an external time code generator
Synchronize the internal time code generator with the SMPTE-compliant LTC time code, which is
input from the TC IN terminal. After synchronization (slave lock), the internal time code generator
continues to run even if external time code signals are not input.
Memo
● If the phase of the external
time code generator and
the phase of the video are
not synchronized, the
“EXT” display blinks.
● If a user’s bit is input to the
TIME CODE IN terminal
with its all digits set as
“F”, BR-DV6000 converts
FFFFFFFF to FFFFFFFE
before recording.
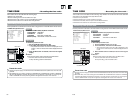
:Connection:
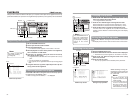
Ⅵ
Input reference video signals to the external time code
generator and the SYNC IN terminal of BR-DV6000.
Ⅵ Connect the TIME CODE IN terminal of BR-DV6000 with
the LTC time code output terminal of the external time
code generator.
:Setting:
Ⅵ
Front switches
• Set the INPUT SELECT switch to any setting except DV.
• Set the COUNTER switch to “TC”.
• Press the DISP button and set the LCD to the enlarged display
mode.
Ⅵ
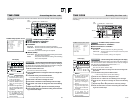
TC/UB/CLOCK(1/2) Menu screen
Set TCG SOURCE to “EXTERNAL”.
:Operation:
1.
Perform setting for the external time code generator.
2.
Set BR-DV6000 to the RECORDING mode.
¥ The EXT display of the LCD lights up and the time code and
user’s bit of the external time code generator are recorded on
the tape.
During recording, if the internal time code generator is slave-
locked once, the time code continues to run even if the input
time code stops.
REF video
signal
Synchronized signal
generator
SYNC IN terminal
Time code generator
TIME CODE IN terminal
LTC time code
EXT display
63
BR-DV6000
PROFESSIONAL
RESET
A.DUB
EJECT
COUNTER
AUDIO INPUT
SELECT
MONITOR OUTPUT REMOTE
LOCAL
CTL L
MIX
R
CH-1/2
MIX
CH-3/4
DV
LINE
Y/C
(CPN)
TC
UB
REW STOP FF
REC
OPERATE
PLAY PAUSE
DISP
SET INDEX+
BLANK CUE UP
REC LEVEL
CH-1/3 CH-2/4
32K CH–1/2 0 mSP in00
ASSEM
W
ARNING 7001
DRUM MOTOR FAILURE
REC INHIBIT
03/04/03 PLAY
11:20:00 TCR 02:00:00:00
Monitor / LCD (Status display)
VIDEO
LINE
IN
OUT
MONITOR
OUT
DC12V
DV
IN/OUT
IN OUT
OFF
AUDIO
REMOTE2
IN
B-YR-Y
SYNC IN
TIME CODE
IN OUT
Y
COMPONENT
OUT
CH 1/3 CH 2/4
IN
OUT
MONITOR
OUT
REMOTE1
TIMER
REC PLAY
SERIAL
REMOTE
SINGLE
GND
Y/C
TIME CODE
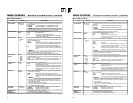
– Playing back the time code –
BR-DV6000 is also equipped with a time code reader. During playback, the time code or user’s bit
data recorded on the tape is displayed on the monitor or the LCD.
COUNTER switch
TIME CODE OUT terminal
Time code or user’s bit
1.
Select the time code data to display.
Set the COUNTER switch to “TC” or “UB”.
2.
Press the PLAY button to go to the PLAYBACK mode.
¥ It displays the time code and the user’s bit on the monitor or
the LCD. The counter display mode becomes TCR or UBR.
• The LTC time code is output from the TIME CODE OUT terminal
on the rear panel.
❈
The VITC time code is not output.
If the COUNTER switch is set to CTL, the time code is not out-
put.
Caution on time code playback
● During playback, if a portion of tape without recorded time code
runs through, the time code stops running. Playback continues.
● If tapes without recorded user’s bit, e.g. those recorded with a
home-use DV VCR, are played back on BR-DV6000, “– –” is dis-
played.