


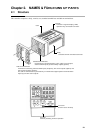

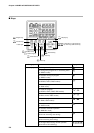

Chapter 2. NAMES & FUNCTIONS OF PARTS
2-7
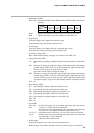
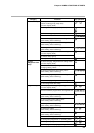
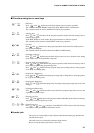
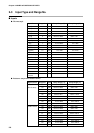
■ Functions using two or more keys
PROG
+
RUN/HOLD
: Reset keys
Press
RUN/HOLD
with
PROG
held down in the basic display state to reset the controller.
The controller enters the READY mode in the RUN, HOLD, FAST or END modes.
The controller cannot be reset in the READY mode by key operation.
PROG
+
DISP
: Advance keys
Press
DISP
with
PROG
held down in the program operation mode in the basic display state to
advance the program.
In the RUN, HOLD or FAST modes, the program advances to the next segment.
The controller cannot advance in the READY mode by key operation.
FUNC
+ : Fast keys
Press with
FUNC
held down in the program operation mode in the basic display state to
fast-operate the program.
The controller enters the FAST mode from the RUN or HOLD modes.
FUNC
+
PARA
: Parameter setup keys
Press
PARA
with
FUNC
held down in the basic display state to move to selection of the setting
group (major items) in the parameter setup state.
FUNC
+
PROG
: Program setup (programming) keys
Press
PROG
with
FUNC
held down in the program operation mode in the basic display state to
move to the program setup (programming) state.
Press
PROG
with
FUNC
held down in the program setup state to change the No. of the program
to be set up in ascending order.
FUNC
+ : Program No. change keys
Press with
FUNC
held down in the program setup state to change the No. of the program to
be set up in descending order.
FUNC
+
CLR
: Program item delete keys
Press
CLR
with
FUNC
held down during entry of settings in the program setup state to clear the
setting.
FUNC
+
ENT
: Segment insert/delete keys
Press
ENT
with
FUNC
held down at SP or time item in the program setup state to move to the
segment insert/delete screen.
+
PROG
: Program copy keys
Press
PROG
with held down in the program operation READY mode in the basic display
state to move to the program copy screen.
FUNC
+
CLR
+
DISP
: General reset keys
Press
CLR
and
DISP
with
FUNC
held down in the READY AUTO mode in the basic display
state to move to the general reset confirmation screen.
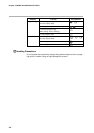
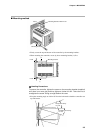
■ Loader jack
This jack is for connecting the loader. Objects other than the loader plug should not be
inserted into this jack.
The loader jack is not isolated from internal digital circuits.
Be sure to cap the loader jack when it is not in use.