


11-2 Calibration Procedures
■ Enter calibration mode
(1) Release keylock. (PARA
LoC=0
and
PrtC=0
)
(2) Press DISP key to permit ordinary indication condition.
Change to READY (RUN and HLD are off) and AUTO (MAN off) modes.
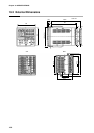
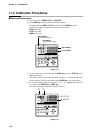
The following LEDs will illuminate after the above operations.
RUN LED is OFF
HLD LED is OFF
MAN LED is OFF
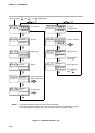
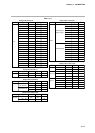
Figure 11-2.
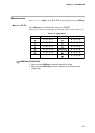
(3) To enter calibration mode, hold down the FUNC key, and press ENT key and ↓
key simultaneously.
The display will show the symbols described in Figure 11-3. If the indication is dif-
ferent, repeat the above procedure after pushing DISP key to refresh the display.
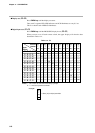
(4) To select individual calibration items, press ↑, ↓, ←, or → keys to select the item
by scrolling, then PARA key, and ENT key.
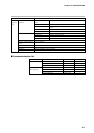
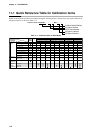
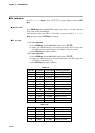
The order of calibration items is described in Table 11-2.
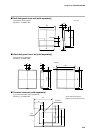
Figure 11-3.
0.0.0.0.
A.d.J.S.
00
00
AT ENT
FUNC A/M
PARA CLR
LOADER
PROG
RUN/HOLD DISP
❍RUN
❍HLD
❍MAN
❍PRG
PROFILE
PROG SEG
❍PV
❍SP
❍OUT
❍TM
❍CYC
❍CH1
❍CH2
❍BAT ❍AT ❍OT1 ❍OT2 ❍OT3
❍EV1 ❍EV2 ❍EV3 ❍T1 ❍T2 ❍T3 ❍T4 ❍T5
Upper Display
Lower Display
PROG Display
(Program No. Display)
SEG Display
(Segment No. Display)
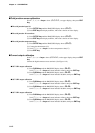
AT ENT
FUNC A/M
PARA CLR
LOADER
PROG
RUN/HOLD DISP
❍RUN
❍HLD
❍MAN
❍PRG
PROFILE
PROG SEG
❍PV
❍SP
❍OUT
❍TM
❍CYC
❍CH1
❍CH2
❍BAT ❍AT ❍OT1 ❍OT2 ❍OT3
❍EV1 ❍EV2 ❍EV3 ❍T1 ❍T2 ❍T3 ❍T4 ❍T5
11-6
Chapter 11. CALIBRATION