


63
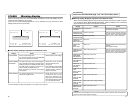
DISPLAY menu
The DISPLAY menu consists of 2 menus (1/2 and 2/2 menu)
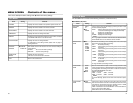
Ⅵ DISPLAY (1/2) menu
Items Setting Contents
DISPLAY
COUNTER POSI.
TIME CODE
VTR MODE
TAPE REMAIN
TIME/DATE
OFF
ⅷON
AUTO
ⅷLOWER-R
LOWER-L
UPPER-R
UPPER-L
CENTER
OFF
ⅷON
OFF
ⅷON
OFF
ⅷON
OFF
TIME
DATE
ⅷDATE +TM
Use this menu item to choose whether to have the characters of
the status screen displayed on the monitor connected to VIDEO
LINE OUT or Y/C OUT terminal.
OFF : No on-screen display. Video display only.
ON : Always provide on-screen display.
AUTO : Provide on-screen display for about 4 seconds on switch-
ing modes.
Memo
This setting can also be selected from the DISPLAY button of the
wireless remote controller.
Use this menu item to select the position on the monitor for time
code display.
LOWER-R : Lower right
LOWER-L : Lower left
UPPER-R : Upper right
UPPER-L : Upper left
CENTER : Center
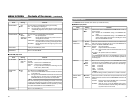
Use this menu item to turn on/off the display of time codes on the
monitor.
OFF : No display
ON : Display
Use this menu item to turn on/off the display of the VTR mode on
the monitor.
OFF : No display
ON : Display
Use this menu item to turn on/off the display of remaining tape on
the monitor.
OFF : No display
ON : Display
Use this menu item to turn on/off the date/time display on the moni-
tor and to select the display format.
OFF : No display of date/time.
TIME : Display the time only.
DATE : Display the date only.
DATE +TM : Display the date/time.
62
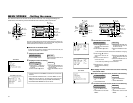
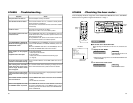
MENU SCREEN
–
Contents of the menus
–
(continued)
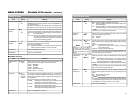
TIME CODE menu
Items Setting Contents
TC
CLEAR
NDF/DF
(NTSC
ONLY
)
TC DUPLICATE
TC ADJUST (DV)
PAGE BACK
ⅷCANCEL
EXECUTE
NDF
ⅷDF
ⅷOFF
AUTO
NON DROP
ⅷOFF
+1F
+2F
–2F
–1F
Presets the time code.
For details, please refer to Page 36 "Presetting Time Codes".
Use this menu item to choose whether to clear the time code values.
CANCEL : Do not clear
EXECUTE : clear
Select the framing mode for the time code generator.
NDF : Sets the unit to the non-drop mode. Use this setting when
the number of frames of the time code is important.
DF : Sets the unit to the drop-frame mode. Use this setting for
real-time based time codes.
Use this menu item to select the type of time code to be recorded
for DV signal input.
OFF : Records the time codes of the built-in time code
generator of the main unit.
AUTO : Records the time code input to the DV IN terminal.
The framing mode of the time code will be auto-
matically set to the framing of the input time code.
NON DROP :Records the time code input to the DV IN terminal.
The framing mode of the time code will be fixed as
non-drop framing. Use this setting when dubbing
on tapes recorded with BR-DV600, GY-DV500, GY-
DV550, or GY-DV700W in the non-drop frame mode.
(NTSC only)
Use this menu item to set the timing to output time codes from the
9PIN REMOTE terminal of the main unit to the editing remote con-
troller.
OFF : Usually, this is selected.
+1F :Sets the timing to 1 frame faster.
+2F :Sets the timing to 2 frames faster.
–2F : Sets the timing to 2 frames slower. Use this setting when
editing video or audio using DV signals.
–1F : Sets the timing to 1 frame slower.
Return to the TOP MENU.