


32
PREPARATION
–
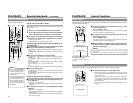
Setting/displaying date and time
–
(continued)
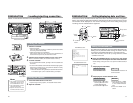
SET
MENIU
EJECT
REC PLAY
PAUSE
REW
STOP
FF
DVCAM NTSC
PAL
REC INH.
CH-1/3
CH-2/4
BR-DV3000
5.
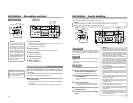
EJECT button
3.
–
13
,
4.
PLAY button
3.
–
13
,
4.
STOP button
3.
–
2
,
4.
REW button
3.
–
4
,
4.
PAUSE button
3.
–
2
FF button
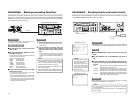
DISPLAY
BARS
MENU SEARCH+
SEARCH–
SET
BLANK
STILL
MODE
AUDIO
MUTING
OUT SEL.
OUT LEV.
3.
–
13
,
4.
button
3.
–
2
button
3.
–
13
,
4.
button
3.
–
2
,
4.
button
5.
MENU
button
3.
–
4
,
4.
SET button
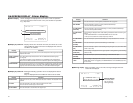
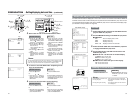
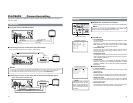
–––CLOCK ADJUST–––
DATE 10/10/02
TIME 00:00
PAGE BACK
Date
Time
–––CLOCK ADJUST–––
DATE 10/10/02
TIME 12:00
PAGE BACK
–––CLOCK ADJUST–––
DATE 10/10/02
TIME 12:00
PAGE BACK
3.
Set the date or time on the CLOCK ADJUST menu.
Main unit
1
Press the PLAY or STOP
button and bring the cursor
to the DATE or TIME setting.
Then press the FF or PAUSE
button.
2
Press the FF or REW but-
ton and select the data seg-
ment to be set up.
• The selected value blinks.
3
Press the PLAY or STOP
button to set the value.
4
Repeat step 1 – 3. After
completing the necessary
settings, press the PAUSE
button.
Remote controller
1
Press the
ᮡ
or
ᮢ
button
and bring the cursor to the
date or time setting. Then
press the
ᮣ
or SET button.
2
Press the
ᮣ
or
ᮤ
button
and select the data seg-
ment to set up.
•The selected data seg-
ment blinks.
3
Press the
ᮡ
or
ᮢ
to set the
value.
4
Repeat step 1 – 3. After
completing the necessary
settings, press the SET
button.
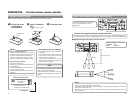
Memo
The ‘seconds’ segment cannot be set up. After the ‘minute’ segment is set
up, please press the SET button (remote controller) or the PAUSE button
(main unit) in synchronization with a separate time indicator (clock).
4.
To return to the TOP MENU after completing all set-
tings, do the following:
Main unit
• Press the REW button.
Or
• Press the PLAY or STOP but-
ton to bring the cursor to
PAGE BACK and then press
the PAUSE button.
Remote controller
• Press the
ᮤ
button.
Or
• Press the
ᮡ
or
ᮢ
button to
bring the cursor to PAGE
BACK and then press the
SET button.
5.
To return to the usual menu, do the following:
Main unit
• Press the EJECT button.
Or
•Bring the cursor to the EXIT
item of the TOP MENU and
press the PAUSE button.
Remote controller
• Press the MENU button
Or
•Bring the cursor to the EXIT
item of the TOP MENU and
press the SET button.
33
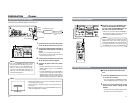
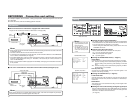
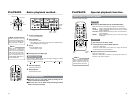
SELECTING DATE/TIME DISPLAY
The date and time data is displayed on the monitor screen connected to the VIDEO LINE OUT
terminal and Y/C OUT terminal. Setup can be performed via the DISPLAY (1/2) menu to turn
on/off the date & time display and via the DISPLAY (2/2) menu to determine the display style.
(For details on setup method:
☞
Page 54)
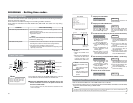
–––MENU–––
SYSTEM..
REMOTE. .
AUDIO/VIDEO. .
TIME CODE..
DISPLAY SET..
CLOCK ADJUST..
FACTORY SETTING CANCEL
DRUM HOUR METER 000000
EXIT
–––DISPLAY[1/2]–––
DIPLAY OFF
COUNTER POSI . LO
W
ER-R
TIME CODE ON
VTR MODE ON
TAPE REMAIN OFF
TIME DATE DATE+TM
AUDIO INFO. CH+RATE
NEXT PAGE
PAGE BACK
–––DISPLAY[2/2]–––
DATE STYLE DD /M M/YY
TIME STYLE 24H
BARS OFF
PAGE BACK
32K CH–1/2
SP
000
min
10/10/02 STANDBY–OFF
12:00:00 TCR 02:00:00:00
Date/time display
DISPLAY
BARS
MENU SEARCH+
BLANK
STILL
MODE
AUDIO
MUTING
DISPLAY button
TOP MENU display
DISPLAY (1/2) menu
DISPLAY (2/2) menu
SETTING
1.
Select DISPLAY SET item from the TOP MENU and dis-
play the DISPLAY (1/2) menu.
2.
Set the TIME/DATE setting on the DISPLAY (1/2) menu.
Ⅵ TIME DATE
OFF : Does not display date or time.
TIME : Displays time only.
DATE : Displays date only.
DATE + TM : Displays both the time and date.
3.
Select the NEXT PAGE item of the DISPLAY (1/2) menu
to engage the DISPLAY (2/2) menu.
4.
Set the DATE STYLE and TIME STYLE items of the
DISPLAY (2/2) menu.
Ⅵ DATE STYLE... Set the order of the date display.
YY/MM/DD: Year / month / day
MM/DD/YY: Month / day / year
DD/MM/YY: Day / month / year
Ⅵ TIME STYLE...Select the style of time display.
24H: 24-hour time mode
12H: 12-hour time mode
Enabling on-screen display:
Main unit
• Set the DISPLAY item of the
DISPLAY (1/2) menu to ON
or AUTO.
Remote controller
• Press the DISPLAY button.
Memo
• RECORDING or STOP mode : Data in the built-in clock is displayed.
• During Playback : The date/time recorded on the tape is
displayed.
•During DV signal recording : The date/time data from the DV termi-
nal is displayed.