


PAGE
43
MAXTOR SHARED STORAGE II
WEB USER INTERFACE
Manage Digital Photos, Music, Video
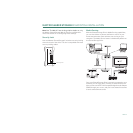
Media server technology enables digital photo, music, and
video playback to networked home entertainment systems.
By default, the Media Server is disabled.
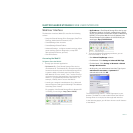
To Manage Digital Photos, Music and Videos
1. Click
Manage Digital Photos, Music and Videos
.
2. Click
Enable Media Server
.
3. Click
Next
.
4. Select the shared folders that will be searched for music,
videos and/or pictures and click
Next
.
Note: You can only check one (1) iTunes folder at any given
time.
5. Click Done to return to the Shared Folders Management
page.
To Refresh Media Server
This option is only available if Media Server is enabled. By
default, the Media Server automatically searches for new
media files every two (2) hours. To perform an immediate
update to the Media Server database, you must refresh it.
1. Click Manage Digital Photos, Music and Videos.
2. Click Refresh. The Media Server will refresh
automatically in the background.
3. Click Done to return to the Shared Folders Management
page.
To Clean Up Media Server
This option is only available if Media Server is disabled. This
feature allows you to prevent potential database corruption
when the Shared Storage Drive’s Media Serving feature is
disabled.
1. Click Manage Digital Photos, Music and Videos.
2. Click Clean Up. The Media Server’s database will be
cleaned in the background.
3. Click Done to return back to the Shared Folders
Management Page.
To Disable Media Server
1. Click Manage Digital Photos, Music and Videos.
2. Click Disable Media Server.
3. Click Next.
4. Click Done to return to the Shared Folders Management
page.
Shared Folder Backup
To use this feature, an external USB drive must be connected
to the Shared Storage Drive. After connecting, the External
Storage unit will require a re-format from the Shared Stor-
age’s browser interface.
For connection information, refer to the Shared Storage II
User manual regarding the use of external USB drives.
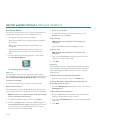
Formatting the External USB drive
This procedure must be followed in order to use the Shared
Folder Backup features of the Shared Storage Drive.
1. Connect the external USB drive to your Shared Storage
Drive.
2. From the Web User Interface (Web UI), select Shared
Folder Backup.
3. A page displays notifying you that, “Your backup drive is
not formatted properly. Do you wish to format it now?”
Select Yes to continue.
4. A page will display prompting you to select a USB drive to
format. Select the drive from the drop-down menu and
choose Next.
5. A warning will display, notifying you that formatting will
erase all data currently on the USB drive. Choose Yes.
6. A page appears showing format status of the USB drive.
When finished, a page appears notifying you that the drive
is formatted and ready for use. Choose Done and return to
the Shared Folder Backup page.