


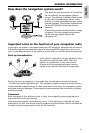


Install installation bracket, Fig. 8 - 10
The navigation radio can be installed into a vehicle’s DIN radio slot using the
installation bracket provided.
■
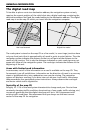
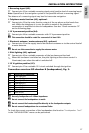
Note before installing, Fig. 13:
✎
The radio must be installed horizontally. Deviations of - 10 to + 30 degrees can be
set in the “Mounting angle” menu (see “Initial operation”). Larger deviations may
result in malfunctions.
✎
A rigid connection to the vehicle body is a prerequisite for correct functioning of
the system
☞
Insert the installation bracket into the DIN slot and bend the appropriate metal tabs
inwards using a screwdriver (Fig. 10). Take care not to damage any hidden parts in
the dashboard.
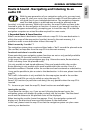
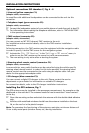
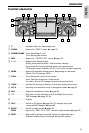
Mounting the radio, Fig. 11
1. Connect the GPS antenna connector to the GPS antenna socket on the back of the
unit.
2. Insert antenna plug E into antenna socket. If necessary, use a suitable antenna
adapter. Use hook (J) on the back of the unit for secure attachment.
3. Insert ISO plug A (power supply) into the radio ISO socket A'.
4. Insert ISO plug B (loudspeakers) into the radio ISO socket B'.
If extensions are to be connected to the unit (optional):
5. Push all chamber C connectors together and plug them into the radio ISO socket C'.
Push the green connector C2 between the yellow connector C1 and the blue
connector C3. At least one of these connectors is required for C2 to engage into the
socket:
Yellow connector C1: Left chamber of ISO socket C1'.
Green connector C2: Centre chamber of ISO socket C2'.
Blue connector C3: Right chamber of ISO socket C3'.
6. Push the unit into the installation bracket until it engages.
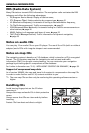
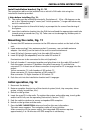
Initial operation, Fig. 12
1. Reconnect the battery.
2. Restore complete functioning of the electrical system (clock, trip computer, alarm
system, airbag, immobiliser, etc.).
3. Switch on the ignition.
4. Insert the map CD in the radio. To register the system and enable map, travel guide
and/or traffic info, see the operating instructions, Section “C-IQ”.
5. Park the vehicle outdoors to ensure unimpeded GPS reception.
6. Switch on the ignition and the radio.
7. Press the NAV / NAVIGATION button and confirm the user information.
The main menu appears. The navigation radio will now initialise.
After connection of the power supply, the integrated GPS receiver requires
approximately 2 to 10 minutes until GPS reception is satisfactory.
k
INSTALLATION INSTRUCTIONS
19
English