


IMPORTANT INFORMATION
Please read this information carefully and follow the all the instructions outlined
below. This will ensure the reliable operation and long service life of your navigation
radio.
Keep the packaging and operating instructions in a safe place in order to pass them on
to a subsequent owner in the event of selling the unit at a later date.
A
Only trained specialists may install the unit.
A
Observe automotive industry quality standards.
A
Fire hazard! When drilling, care must be taken not to damage concealed wiring
harnesses, the fuel tank and fuel lines.
A
Never drill into supporting or safety-relevant body parts.
A
Only install in vehicles with 12V on-board voltage and negative earth. Risk of
malfunction, damage and vehicle fire if installed in unsuitable vehicles (e. g. heavy goods
vehicles, buses).
A
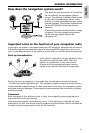
Always observe correct assignment of vehicle connections. Incorrect assignment of the
connections may lead to damage of the unit or vehicle electrical system/electronics.
Connection in vehicles equipped with standard ISO
connectors
The navigation radio may be installed without major preparation in vehicles equipped
with ISO standard connectors. Some signals may have to be connected to ISO
connector A (refer to “Connection overview ISO chamber A”).
For vehicles with different connection requirements, ask your dealer for special leads
for a problem-free installation.
Connection in vehicles without standard ISO connectors
If no adapter leads are available for your vehicle, connect the navigation radio as
described in “Electrical connections”.
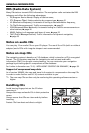
Taking safety precautions, Fig. 1
A
Before starting work, disconnect the earth lead from the negative terminal of the
vehicle battery in order to prevent short circuits. For this purpose, follow the vehicle
manufacturer’s safety instructions (alarm system, airbag, immobiliser, etc.).
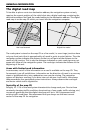
Making the electrical connections
Route all wiring with care. For wiring details, refer to the connection diagram on the
back fold-out page and the following table.
Do not cut non-assigned wires. Instead, wind them together and secure to one side.
They may be required for retrofitting additional functions.
INSTALLATION INSTRUCTIONS
15
English