


10 11
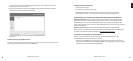
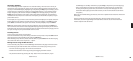
Speaker Base
PC or Mac with
music files
Power Cable
Wireless Router/Switch
(or wired Ethernet)
Connecting to powered speakers (M1000)
b. Connect your SoundBridge to your stereo system’s Aux or other “Line Input,” using one of
the RCA (red/white) audio cables included with your SoundBridge.
Note: If your speakers have a male connector, you will need a female-to-female coupler
available from your local electronics accessory store.
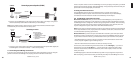
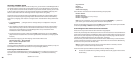
PC or Mac with
music files
Connect 1 of the following:
(1) Optical “Toslink” SPDIF from
SoundBridge to receiver
(2) Black SPDIF Coax (RCA) to “Coax Digital
In” on your receiver
(3) Analog RCA cable (white/red) to AUX
on your receiver
Power Cable
Connecting to a stereo
Wireless Router/Switch
(or wired Ethernet)
c. Connect to your stereo system using either coaxial SPDIF digital or optical SPDIF digital (the
SoundBridge has connectors for both) — cables sold separately.
V. Connecting SoundBridge to AC Power
If you plan to use an Ethernet connection, be sure the cable is plugged in to the unit. Plug the
power cord into the SoundBridge unit, and plug the other end into to a wall outlet.
There is no power switch to turn on SoundBridge. As soon as you plug in the power, you should
quickly see the welcome message “Roku SoundBridge.” If not, please stop and ensure that your
power cable is connected properly on both ends.
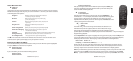
VI. Using Your Remote Control
The SoundBridge remote control is an infrared remote, so it needs “line of sight” to
SoundBridge in order to operate. Point the remote in the direction of your SoundBridge,
and make sure that the IR receiver window is not blocked by another object.
VII. Establishing a Network Connection
Wired Ethernet Network: After you have connected SoundBridge to your computer via a
switch/hub/router (or directly to your computer via crossover cable) and powered up the unit,
SoundBridge will auto-confi gure its network settings (using DHCP or AutoIP). There is nothing
you need to do. If for some reason you have trouble connecting to your network, select the
“System Confi guration” option, then select “Show Wired Ethernet Status.”
Note: Do not plug in an Ethernet cable if you plan to use your Wi-Fi network to avoid confusion
in the setup of the device. Also, if you plan to use an Ethernet connection, make sure the cable
is connected before powering up the device.
Wireless Network: If you have an open and visible Wi-Fi network in your home (one which
broadcasts its name, and which has no security keys set) then SoundBridge will auto-connect
to your wireless network. However, you will be asked to enter your network’s name (SSID) if:
- SoundBridge detects more than one Wi-Fi network (as some advanced users have in their
home, or if your neighbor’s signal is leaking over), or
- Your Wi-Fi network does not broadcast its name (for security reasons)
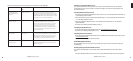
In these cases, enter the SSID using the remote control. Use the Left/Right [◁ ▷] arrows to
choose letters, and use the Up/Down [△ ▽] arrows to change to Uppercase and to other
character sets (numbers, international characters) and to enter “Space”, “Delete” and “OK”
when you’re done.
SoundBridge supports networks with WEP security. WPA is not yet supported. If you have a
WEP security key, you will need to enter your WEP key manually into SoundBridge. This is the
1
Section 1: Getting StartedSection 1: Getting Started