


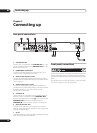

Connecting up
02
19
En
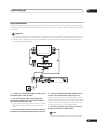
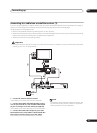
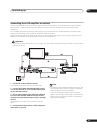
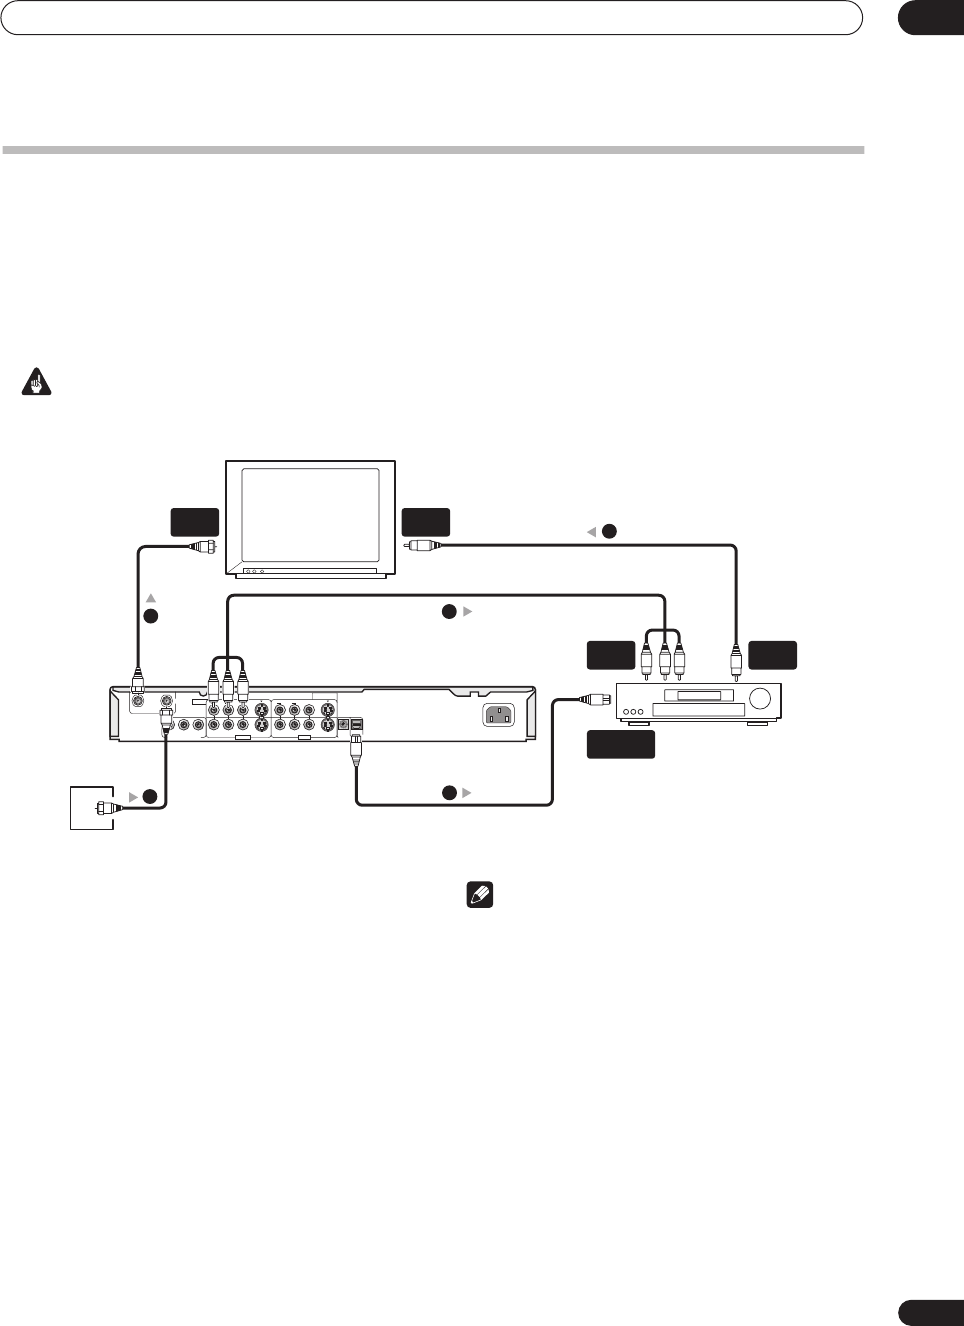
Connecting to an AV amplifier or receiver
To enjoy multichannel surround sound you need to connect this recorder to an AV amp/receiver using the digital
optical output. In addition to the digital connection, we recommend also connecting using the stereo analog
connection.
You’ll probably also want to connect a video output to your AV amp/receiver. Use the standard (composite) video
output (as shown here), or the S-video or component video connections.
See also Audio Out settings on page 100 for how to set up the digital audio output. (Noise may be output from your
speakers if the recorder is not set up to work with your AV amp/receiver.)
Important
• Do not connect this recorder to your TV ‘through’ your VCR or other component using A/V cables. Always connect
it directly to your TV.
1 Connect RF antenna cables as shown.
This enables you to watch and record TV channels.
2 Connect the AUDIO and VIDEO OUTPUT jacks (1
or 2) on this recorder to a set of audio/video inputs
on your AV amp/receiver.
3 Use an optical digital audio cable (not supplied)
to connect the OPTICAL DIGITAL OUT jack on this
recorder to an optical digital input on your AV amp/
receiver.
This enables you to listen to multichannel surround
sound.
4 Connect the AV amp/receiver’s video output to a
video input on your TV.
Note
• The diagram shows standard video connections, but
you can alternatively use the S-video or component
video connections if they’re available.
• If your AV amp/receiver doesn’t have an optical
digital input, but has a coaxial type, converter boxes
that convert from optical to coaxial are available at
specialist audio dealers.
COMPONENT VIDEO OUT
DIGITAL OUT
AC IN
OPTICAL
CONTROL
IN
YP
B
P
R
INOUT
VHF
/
UHF
RL
AUDIO
VIDEO
S-VIDEO
RL
AUDIO
VIDEO
S-VIDEO
OUTPUT 2
OUTPUT 1
INPUT 3
INPUT 1
/
AUTO START REC
VHF/UHF
IN
VIDEO
IN
VIDEO
OUT
A/V
IN 1
DIGITAL IN
OPTICAL
2
4
1
3
Antenna/cable TV
wall outlet
1
TV
AV amp/
receiver