


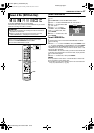

Masterpage:Right+
EN 83
Filename [MX1S_12Subsidiary.fm]
SUBSIDIARY SETTINGS
Page 83Saturday, 30 October 2004 16:18
8 DIMMER — BRIGHT / DIMMED
You can change the brightness of the front display panel.
BRIGHT: Normally select this.
DIMMED: To dim the front display panel. (Blue lamp on the front
display panel is turned off.)
8 POWER SAVE — OFF / ON
When this function is set to “ON”, you can reduce the power
consumption while the unit is turned off.
● During Power Save mode —
— the front display panel will be turned off.
● Power Save does not work when —
— the unit is in the Timer mode.
— the unit’s power is turned off after timer-recording or Instant Timer
Recording.
— the Automatic Satellite Program Recording mode is engaged.
(
੬ pg. 59)
● It takes some time for the unit to complete initialization after you turn
on the unit power, with “WAKE UP” blinking on the front display
panel.
8 ON SCREEN LANGUAGE
This unit offers you the choice to view on-screen messages in 3
different languages.
For details, refer to “On-screen Language Set” (੬ pg. 21).
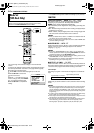
VIDEO IN/OUT
8 MONITOR TYPE — 4:3LB / 4:3PS / 16:9 AUTO / 16:9 FIX
You can select the monitor type depending on the TV used when
you play back DVD VIDEO discs recorded for wide-screen TVs.
For details, refer to “Monitor Set” (੬ pg. 26).
8 FRONT AUX F-1 — VIDEO / S-VIDEO
Select the appropriate mode depending on the connector (F-1)
being used on the front panel.
VIDEO: To use the [VIDEO] input connector on the front panel.
S-VIDEO: To use the [S-VIDEO] input connector on the front panel.
8 REAR AUX L-1 — VIDEO / S-VIDEO
Select the appropriate mode depending on the connector (L-1)
being used on the rear panel.
VIDEO: To use the [VIDEO INPUT] connector on the rear panel.
S-VIDEO: To use the [S-VIDEO INPUT] connector on the rear
panel.
.
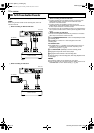
If you connect the unit and TV with Component Video Connection
(੬ pg. 19), you can select the scan mode from two modes:
Interlaced scan mode which is used in the conventional TV
system, and Progressive scan mode which enables reproduction
of higher-quality images.
8 Interlaced scan
In the conventional video system, a picture is shown on the display
monitor in two halves. The Interlaced scan system places lines of the
second half of the picture in-between lines of the first half of the picture.
8 Progressive scan
Progressive scan displays all the horizontal lines of a picture at one time,
as a single frame. This system can convert the interlaced video from DVD
into progressive format for connection to a progressive display. It
dramatically increases the vertical resolution.
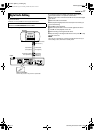
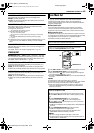
1
Press
HDD
or
DVD
so that the HDD or DVD lamp lights up on the unit.
2
Press
PROGRESSIVE SCAN
for 3 or more seconds.
●
Video output indicator ( ) lights on the front display panel if Progressive
scan mode has been established. (
੬
pg. 14)
●
Each press of
PROGRESSIVE SCAN
for 3 or more seconds switches the
scan mode.
NOTES:
● Interlaced scan mode is the setting at your purchase.
● Interlaced scan mode might be suitable depending on video material.
● Scan mode cannot be set while menu screen is displayed.
● When the Progressive scan mode is engaged, no video signal is
output from [S-VIDEO OUTPUT] connector and [VIDEO/AUDIO
OUTPUT] connectors.
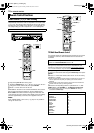
Scan Mode Set
A
TTENTION:
Your TV needs to be compatible with Progressive.
● Turn on the unit.
● Turn on the TV and select the video channel (or AV mode).
● Slide the TV/CABLE/DBS/DVD switch to DVD.
Watch the images on VHS deck in the Progressive scan
mode via component video
1
Set the Progressive-compatible TV to the component input mode.
2
Press
HDD
or
DVD
so that the HDD or DVD lamp lights up on the
unit.
3
Press
PROGRESSIVE SCAN
for 3 or more seconds.
●
The video output indicator lights up on the front display panel.
4
Press
VHS
so that the VHS lamp lights up on the unit, then press
PROGRESSIVE SCAN
.
●
“COMP OFF” is displayed on the front display panel. It will be displayed for
5 seconds.
5
Press
PROGRESSIVE SCAN
again within 5 seconds.
●
“COMP ON” is displayed on the front display panel.
●
The VHS progressive scan image will then be outputted from the
[COMPONENT VIDEO OUT (Y/P
B
/P
R
)] connectors.
NOTES:
● Be sure to engage the HDD or DVD deck in stop mode.
● To disengage the VHS Progressive Scan mode, perform steps
4
and
5 to switch to “COMP OFF”.
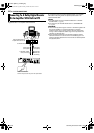
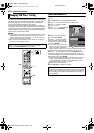
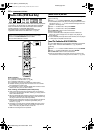
PROGRESSIVE SCAN
DVD
HDD
CABLE/DBS
DVDTV
MX1S_00.book Page 83 Saturday, October 30, 2004 4:18 PM