


Filename [MX1S_11Editing.fm]
Masterpage:Left+
74 EN
EDITING
Page 74 Saturday, 30 October 2004 16:18
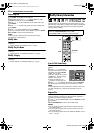
You can dub programs from a camcorder or DV equipment
connected to the unit with a DV cable. The unit’s remote control
allows you the limited control of the connected camcorder or DV
equipment functions during dubbing.
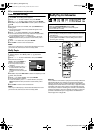
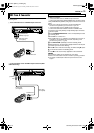
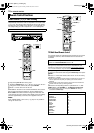
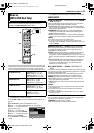
The following on-screen display for DV dubbing appears when
ON SCREEN is pressed while the channel has been set to “DV”.
A Remote control switch
To switch between the devices operable by the remote control
unit. The unit is operable when the remote icon ( )
displayed faces to the left, while the DV device is operable
when the remote icon is facing to the right.
B Auto capture button
Select to start or pause the dubbing. If ENTER is pressed when
the DV device is in the pause condition, preroll editing* where it
is possible to dub with a start time that is highly accurate will be
activated. When the DV device cannot be operated from the
unit (such as in camera mode), proceed with normal recording
(੬ pg. 41, 44).
* Preroll editing refers to the playback after the DV tape is slightly
rewind. (For DV devices that do not support the –1 speed, the
rewinding time may be longer.)
C Sound monitor switch
For selecting the desired sound format for recording. It is not
selectable during dubbing.
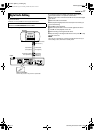
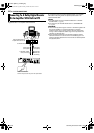
1 Connect a camcorder or DV equipment to the [DV IN] connector
on the unit’s front panel.
2 Press VHS/HDD/DVD SELECT on the unit repeatedly or HDD
on the remote so that the HDD lamp lights up on the unit.
3 Press CH +/– to set the channel to “DV”.
4 Press ON SCREEN.
● The on-screen display for DV dubbing appears.
5 Press we to select , then press ENTER to display
the remote icon (facing to the right) for the DV equipment.
6 Press REC MODE repeatedly to set the recording mode.
7 Locate the point from where you want to start dubbing, then
stop or pause playback by pressing the following buttons on the
remote control: 4, 5, 3, 8, 9
.
● To play back in slow speed (1/10 of the normal speed), press 9 to
pause playback, then press 3 or 5.
● To play back frame-by-frame, press 9 to pause playback, then press
9 repeatedly. Each press of 9 advances a frame.
● To change the playback direction, press 3 or 5.
8 Press we to select , then press ENTER repeatedly
until the desired sound track appears on the TV screen.
AUDIO 1: Select this to record the original stereo sound played
back on the connected DV equipment.
AUDIO 2: Select this to record the dubbed stereo sound played
back on the connected DV equipment.
MIX: Select this to record the sound of both “AUDIO 1” and
“AUDIO 2”.
● Note that this selection is not available when the source program is
recorded in 16BIT (48 kHz) mode.
9 Press we to select , then press ENTER. The
dubbing starts.
● Playback on the external DV equipment and recording on the unit
should start simultaneously.
● To pause dubbing, press we to select , then press
ENTER. Both the unit and the external DV equipment pause
dubbing. Pressing 9 on the unit also works the same way.
10 Press we to select , then press ENTER. Then
press 8. The DV equipment stops.
11 Press we to select , then press ENTER.
12 Press 8 twice on the remote control to stop dubbing.
● Both the unit and the external DV equipment stop dubbing.
NOTES:
● Dubbing copyright guarded programs is not possible.
● Original DV information such as the recording date and time are not
recorded.
● The superimposed indication during the operation or dubbing is not
recorded.
● If the dubbing is paused while the channel is set to “DV”, you cannot
switch channels.
To skip unwanted part of the source picture
Press ENTER to stop both equipment, then press we to select
.
Locate the point where you want to restart dubbing by pressing 4,
5, or 3, then press 8.
Press we to select , then press ENTER to restart
dubbing.
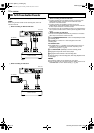
DV Dubbing (HDD & DVD Deck Only)
NOTES:
● Use the DV cable VC-VDV 204U for connection.
● When you connect a PC to the DV IN connector, we do not assure
the normal operation of this unit.
To [DV IN]
DV cable
(VC-VDV 204U)
(not supplied)
Camcorder
DV connector
Your unit
DV equipment
L – R
SOUND1
0:00 1:00 2:00
GR-DV3500
GR-DV3500DV
HDD
00: 00:00. 00
12bit
JVC
00: 00:00. 00
DV
FR360
DV DV
1 2
A B C
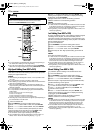
When you dub from DV equipment other than a
camcorder
A Perform step 1 to 4.
B Locate the point from where you want to start dubbing, then
stop on the DV equipment.
● If you pause the DV equipment in this step, a few second’s still
picture will be recorded at the beginning of the recorded program.
C Set the input mode to “DV INPUT” on the DV equipment.
● If you select an input mode other than “DV INPUT”, unwanted
pictures may be recorded at the beginning of the recorded
program.
D Perform step 9 to 12.
MX1S_00.book Page 74 Saturday, October 30, 2004 4:18 PM