


Filename [MX1S_11Editing.fm]
Masterpage:Left+
72 EN
EDITING
Page 72 Saturday, 30 October 2004 16:18
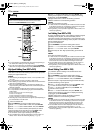
Dubbing From VHS To HDD
(Dubbing An Entire Cassette)
It is possible to perform automatic dubbing of all the recorded
programs of a cassette from the VHS deck to the HDD deck using
the “ENTIRE” dubbing.
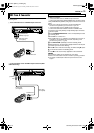
1 Load the cassette you want to dub.
● Set “PICTURE CONTROL” to “EDIT” (੬ pg. 84).
● Set “VIDEO STABILIZER” to “OFF” (੬ pg. 85). However, if this is
set to “ON” during dubbing, it will be set to “OFF” automatically to
prevent image distortion. It will return to
“ON” after dubbing is
completed.
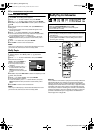
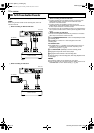
2 Press DUBBING to access the Dubbing Menu screen.
3 Press rtw e to select “VHS ]HDD”, then press ENTER.
4 Press we to select “ENTIRE”, then press ENTER.
5 Press rt to select “SELECT RECORDING MODE”, then press
ENTER. Press rt to select the desired option (SP or EP), then
press ENTER. The confirmation screen appears.
6 Press rt to “SELECT SOUND MODE”, then press ENTER.
Press rt to select the desired option (L/R, L, R or NORM), then
press ENTER. The confirmation screen appears.
7 Press t to select “CONFIRM”, then press ENTER.
8 Press we to select “EXECUTE”, then press ENTER for
confirmation.
● To cancel the dubbing, press 8 then w e to select “CANCEL” and
press ENTER to confirm.
● If the tape is not rewind, the unit will start dubbing after automatically
rewinding the tape to the beginning.
● Upon completing dubbing, the tape will automatically be rewind.
NOTES:
● “SUPERIMPOSE” is automatically set to “OFF”. It will return to
“AUTO” after dubbing is completed.
● The program information at the VHS deck will not be dubbed.
● When there are blanks on the tape of more than 2 seconds, the HDD
deck will enter into pause mode. Dubbing will resume once recorded
portion is detected.
● Dubbing copyright guarded tape is not possible.
● When you select “EDIT” to dub tapes in step 1, be sure to select
“NORM” after you finish dubbing the tapes.
● When dubbing is in progress, only 8 is functional.
Dubbing From VHS To HDD
(Dubbing A Program From Cassette)
It is possible to dub a single title (program) of a cassette from the
VHS deck to the HDD deck using the “1 PROG.” dubbing.
1 Load the cassette you want to dub.
● Set “PICTURE CONTROL” to “EDIT” (੬ pg. 84).
● Set “VIDEO STABILIZER” to “OFF” (੬ pg. 85). However, if this is
set
to “ON” during dubbing, it will be set to “OFF” automatically to
prevent image distortion. It will return to
“ON” after dubbing is
completed.
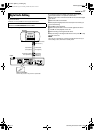
2 Press DUBBING to access the Dubbing Menu screen.
3 Press rtw e to select “VHS ]HDD”, then press ENTER.
4 Press we to select “1 PROG.”, then press ENTER.
5 After pressing r and ENTER, press rt to select the recording
mode, then press ENTER.
6 Press VHS so that the VHS lamp lights up on the unit.
The current display on the screen will be switched to a receiving
broadcast display.
7 Press AUDIO to select the playback sound.
8 Press 4 to locate the point from where you want to start
dubbing, then press 9.
VHS deck enters the record pause mode.
9 Press HDD so that the HDD lamp lights up on the unit.
The current display on the screen will be switched to a receiving
broadcast display.
10 Press we to select “EXECUTE”, then press ENTER for
confirmation.
● To cancel the dubbing, press 8 then w e to select “CANCEL” and
press ENTER to confirm.
NOTES:
● “SUPERIMPOSE” is automatically set to “OFF”. It will return to
“AUTO” after dubbing is completed.
● The program information at the VHS deck will not be dubbed.
● When there are blanks on the tape of more than 2 seconds, the HDD
deck will enter into pause mode. Dubbing will resume once recorded
portion is detected.
● Dubbing copyright guarded tape is not possible.
● When you select “EDIT” to dub tapes in step 1, be sure to select
“NORM” after you finish dubbing the tapes.
● When dubbing is in progress, only 8 is functional.
Dubbing From VHS To DVD
(Dubbing An Entire Cassette)
It is possible to perform automatic dubbing of all the recorded
programs of a cassette from the VHS deck to the DVD deck using
the “ENTIRE” dubbing.
1 Load the cassette you want to dub.
● Set “PICTURE CONTROL” to “EDIT” (੬ pg. 84).
● Set “VIDEO STABILIZER” to “OFF” (੬ pg. 85). However, if this is
set to “ON” during dubbing, it will be set to “OFF” automatically to
prevent image distortion. It will return to
“ON” after dubbing is
completed.
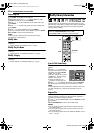
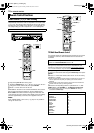
2 Press DUBBING to access the Dubbing Menu screen.
3 Press rtw e to select “VHS ]DVD”, then press ENTER.
4 Press we to select “ENTIRE”, then press ENTER.
5 Press rt to select “SELECT RECORDING MODE”, then press
ENTER. Press rt to select the desired option (SP or EP), then
press ENTER. The confirmation screen appears.
6 Press rt to “SELECT SOUND MODE”, then press ENTER.
Press rt to select the desired option (L/R, L, R or NORM), then
press ENTER. The confirmation screen appears.
7 Press t to select “CONFIRM”, then press ENTER.
8 Press we to select “EXECUTE”, then press ENTER for
confirmation.
● To cancel the dubbing, press 8 then w e to select “CANCEL” and
press ENTER to confirm.
● If the tape is not rewind, the unit will start dubbing after automatically
rewinding the tape to the beginning.
● Upon completing dubbing, the tape will automatically be rewind.
NOTES:
● “SUPERIMPOSE” is automatically set to “OFF”. It will return to
“AUTO” after dubbing is completed.
● The program information at the VHS deck will not be dubbed.
● When there are blanks on the tape of more than 2 seconds, the DVD
deck will enter into pause mode. Dubbing will resume once recorded
portion is detected.
● Dubbing copyright guarded tape is not possible.
● When you select “EDIT” to dub tapes in step 1, be sure to select
“NORM” after you finish dubbing the tapes.
● When dubbing is in progress, only 8 is functional.
MX1S_00.book Page 72 Saturday, October 30, 2004 4:18 PM