


20 Altitude 300-2™ Getting Started Guide
Hardware Installation
4 For table and shelf installations, attach the stick-on feet. The Altitude 300-2
™
kit comes with four stick-on feet for use when the unit is installed on top of
a table or shelf. The feet do not have to be used for wall and ceiling
installations.
WARNING!
The stick-on feet have not been tested for use in a plenum space. Do not use
them for above the ceiling installations.
5 Connect the Ethernet Cable - The Altitude 300-2
™
is connected to a powered,
10/100BaseT Ethernet cable from a Summit 300-48
™
.
NOTE
While the Altitude 300-2
™
uses standard 10/100BaseT signals and PoE power,
it should only be connected to a Summit 300-48
™
port for the proper operation
of the management and configuration features of Extreme Networks’ Unified
Access System.
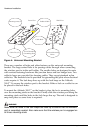
6 Connect the computer cable lock (optional). When the Altitude 300-2
™
installation does not use the universal mounting bracket, the unit can be
locked with a computer cable. The Altitude 300-2
™
has a standard computer
cable lock hole located at the rear of the box, see Figure 1: Rear View of
Altitude 300-2i
™
on page 14, or Figure 2: Rear View of Altitude 300-2d
™
on
page 14.
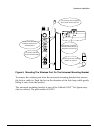
7 Connect the external antennas, Altitude 300-2d
™
. For the Altitude 300-2i
™
skip to step 8. The Altitude 300-2d
™
has connectors for external antennas,
see Figure 2: Rear View of Altitude 300-2d
™
on page 14. The access unit
should be located within the reach of the antenna's cables. The large RP-TNC
connectors are used for 2.4 GHz 802.11b/g antennas and the small RP-SMA
connectors for 5 GHz 802.11a antennas. Two connectors of each type are
supplied to support spatial diversity. When this step is completed go to
step 10.
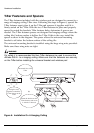
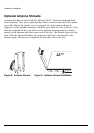
8 Attach the antenna shrouds (Altitude 300-2i
™
) - If the plastic cover is going
to be used attach the antenna shrouds to the antennas, see Figure 8: Antenna
Shroud on page 26.
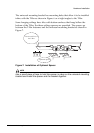
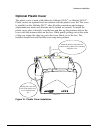
9 Adjust the Integrated antennas, Altitude 300-2i
™
- The Altitude 300-2i
™
is
equipped with two integrated dual band antennas that connect to both the
802.11a and 802.11b/g radios. Selecting the proper angle for the antennas is