


Altitude 300-2™ Getting Started Guide 19
2 Hardware Installation
Installation Steps
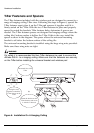
1 For wall and ceiling installations the universal mounting bracket is used. If
unit is being mounted on a table or shelf skip to step 4. Locate and install the
universal mounting bracket. Refer to the instructions for the various ceiling
installation options (Mounting below A Hard Ceiling on page 29, Mounting
below A Hanging Ceiling on page 30, and Mounting Above the Hanging Ceiling
on page 31) and the wall mounting option (Mounting on A Wall on page 32)
in the next section.
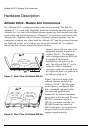
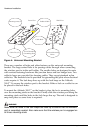
2 Mount the Altitude 300-2
™
on the universal mounting bracket. The Altitude
300-2
™
has three slotted mounting holes on the back of the unit. The
mounting studs on the universal mounting bracket fit into the slotted
mounting holes. The unit slides all the way forward into these holes. The
lock hasp hole on the Altitude 300-2
™
should line up with the lock hasp hole
on the universal mounting bracket when the unit is slid all the way forward,
see Figure 5: Mounting the Wireless Port on the Universal Mounting Bracket
on page 23.
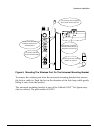
3 Lock and secure the Altitude 300-2
™
. The Altitude 300-2
™
and the universal
mounting bracket are designed to use a Master Lock 120T or similarly sized
padlock to secure the wireless port from theft of from coming off the bracket,
see Figure 5: Mounting The Wireless Port on the Universal Mounting Bracket
on on page 23. Wall and ceiling installations skip step 4.
WARNING!
The Altitude 300-2
™
is not secured to the bracket unless a padlock is used. If a
padlock is not used the unit should be secured to the bracket by a cable tie
through the lock hasp to keep it from falling. Failure to secure the unit is
hazardous.